Networks Tab Web Server Tab Data Forwarding Tab Upgrades Tab Advanced Tab Licence Tab General Tab Text Log Tab Event Viewer Tab CSV Logs Tab Database Tab Email Alerts Tab General Tab Text Log Tab Event Viewer Tab CSV Logs Tab Database Tab Email Alerts Tab Networks Tab Web Server Tab Data Forwarding Tab Upgrades Tab Advanced Tab Licence Tab

 Software/Logon Monitor Server Edition/DB Settings
    This tab page allows you to configure access and control what kind of events to enter into a SQL or Access database.

    Logon Monitor Server Edition Control Panel - DB Settings Tab
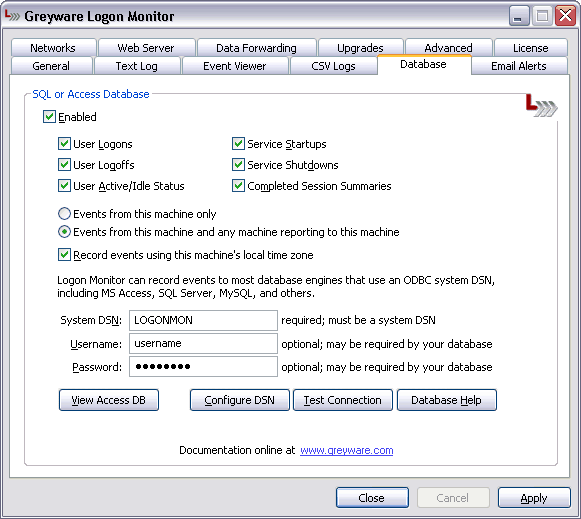
    The Logon Monitor Server Edition Control Panel Applet - Text Log Settings Tab

    SQL or Access Database


    This section controls if logon and startup events are to be sent to a SQL or Access database and what kind of information to include.

      Enabled
      When this box is checked, Logon Monitor Server Edition will record the type of events you select here to a database you specify.

        User Logons - When checked, Logon Monitor Server Edition will record user logon events.

        User Logoffs - When checked, Logon Monitor Server Edition will record user logoff events.

        User Active/Idle Status - These events indicate when a logged-in user's session changes from Active to Idle (for example, when their screen saver kicks in).

        Service Startups - When checked, and entry will be made when the Logon Monitor Server Edition service starts.

        Service Startups - When checked, and entry will be made when the Logon Monitor Server Edition service stops.

        Completed Session Summaries - Checking this box will cause a summary entry to be entered in the log when a user's login session ends. The summary will include information such as how long the user was logged in, how long the session was in Idle status, etc.

      Events from this machine only
      If this button is selected, the text log will only record events that occur on the local machine. Any incoming data records from other Logon Monitor machines will be not be included (note that incoming events may still be collected into one of the other log types, such as CSV, database, or Event Viewer). This allows you to individually determine which of the log types will collect what kind of information (and from where).

      Events from this machine and any machine reporting to this machine
      If this button is selected, the text log will record all events originating on the local machine, and also include any data records reported to the service from other machines running Logon Monitor.

      Record events using this machine's local time zone - Check this box if you want the timestamp on events in the log to be recorded in the time zone that is set on the local machine. If the box is unchecked, events will be stamped with the UTC time.

      Specifying the database to use


      Logon Monitor Server Edition can connect to a database using ODBC via a System DSN. The program comes with a sample Access database named LOGONMON.MDB located in the C:\Program Files\Greyware Logon Monitor folder. During setup, the program automatically configures a System DSN to use this database. Click the button to open this database.

      The Access database is sufficient for low-volume use, such as collecting information from a handful of machines. For collecting larger amounts of data you will want to use a more capable database such as SQL Server or MySQL.

      Creating a SQL database to use with Logon Monitor Server Edition

      1. Create a new System DSN for your SQL Database. Click the button to bring up the ODBC Data Source Administrator. Create a unique System DSN that connects to your particular database engine (refer to your database documentation for configuring an ODBC System DSN).

      2. On the Logon Monitor Server Edition DB settings tab, enter the name of the System DSN you just created in the System DSN: field, and also the username/password you are going to use to access your SQL database (if required).

      3. Create a database with tables to store the Logon Monitor data. Click the button to display generic instructions for creating the SQL database for use with Logon Monitor Server Edition. Refer to your particular database engine's instructions for more specific information on creating databases and tables.

                GENERAL INSTRUCTIONS FOR CREATING A DATABASE 
                AND TABLES FOR LOGON MONITOR
          
          1. Connect to your database server using either a command-
             line tool or a GUI configuration tool. Create the main
             Logon Monitor database.
          
             Example syntax: CREATE DATABASE Logonmon
          
          2. Select the new database
          
             Example syntax: USE Logonmon
          
          3. Create the two tables using the definitions below.
          
             Example syntax:
          
                CREATE TABLE Events
                (
                   SessionID    int,
                   EventTime    datetime,
                   Machine      varchar(48),
                   Username     varchar(48),
                   Event        varchar(20)
                )
          
                CREATE TABLE Sessions
                (
                   SessionID    int, 
                   Machine      varchar(48),
                   Username     varchar(48),
                   Logon        datetime,
                   Logoff       datetime,
                   Status       varchar(20)
                )
          
          4. Create a database user and assign a password. This is
             the username Logon Monitor will use when connecting
             to the database.  This should match the username and 
             password specified on the Logon Monitor control panel
             DB settings tab page.
          
          5. Grant the database user rights to the Logonmon database.
             Minimum rights required are INSERT INTO and SELECT.
          
          6. If using SQL Server, make sure you set the user to log
             on using SQL Server authentication instead of Windows
              

      4. Click the button to verify that Logon Monitor can connect to the database.


      Next Proceed to the Email Alerts page
      Back Back to the CSV Settings page

Domain Time II Software distributed by Microsemi, Inc.
Documentation copyright © 1995-2024 Greyware Automation Products, Inc.
All Rights Reserved
All Trademarks mentioned are the properties of their respective owners.