Manager uses multiple methods to discover machines on the network for remote control and monitoring purposes. You can control how Manager
performs these discovery tasks using settings contained on three dialog pages from the Options item on the main menu.
Click a link to jump to the discussion about each page:
Computer Enumeration...
If you choose Options -> Network Options -> Computer Enumeration... from Manager's menu, you'll see a dialog with the following settings:
These options control how Manager populates the Domains and Workgroups list on the Tree pane of the display when discovering machines from
domains, workgroups, and Active Directory.
Enumeration is a two-step process. When either of these options are checked, Manager will first use the selected method(s) to find any existing
domains and/or workgroups on the network. Then, if the domain or workgroup is marked to be enumerated in the Enumerate... list (see below),
Manager will attempt to discover the individual computers present in the selected domain/workgroups.
Use Microsoft Networking to find domains and workgroups... will cause Manager to examine the Windows Browse list for
machines. This tends to be a slow process and can only discover machines that have NetBIOS over TCP/IP enabled. In general you'll only want to use this method
if there are machines on your network that aren't included in Active Directory (such as workgroup members). Note: This is a legacy protocol
that relies on SMBv1. Workgroup name enumeration and workgroup member enumeration will fail on modern operating systems.
In most cases, you will want to choose Use Active directory to find domains, which is usually much
faster and (assuming your network is correctly configured and maintained) more accurate than by examining the Browse list.
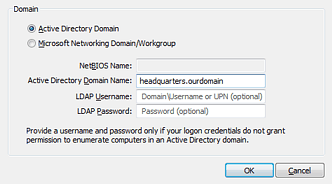
By default, Manager will attempt to access the Active Directory LDAP server used by the domain of the Manager machine, using the credentials of the
logged-on user account to connect to it. Manager will attempt to enumerate all listed domains using this server. If you prefer to use a different LDAP
server for default enumeration, enter its DNS name or IP address and a user account/password with sufficient privileges to connect to the server.
You can set individual LDAP servers and logon permissions for each domain using the Enumerate list below. Select a domain and Edit the entry
to use the LDAP server and user account you prefer.
Use the Tombstone the record and Purge it from the cache
radio buttons to select how you want Manager to treat listed machines that are later removed from Active Directory. On v5.2.b.20210630 and later, if you
change this setting to Purge, Manager will ask if you want to remove all previously tombstoned records. On previous versions, tombstoned records could not be removed.
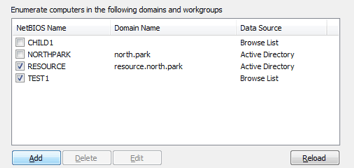
The Enumerate List
Once domains and workgroups have been identified, they will appear in the Enumerate computers in the following domains and workgroups list.
You can use the checkboxes to select which of these you want Manager to enumerate when the program starts, or when you manually refresh the
Domains and Workgroups category in the Tree pane.
Enumeration can take quite some time to complete, especially on large networks, so after machines have been enumerated the first time, you may want to
only re-enumerate them manually when necessary.
Enumeration can be triggered manually for individual domains by highlighting the domain's name (category)
in the Tree pane and right-clicking to choose Refresh from the context menu (or Actions -> Refresh from the main menu). Enumeration for
all domains is initiated by highlighting the Domains and Workgroups category and choosing Refresh.
Limit display by Organizational Unit (OU)
You may further restrict the view of machines by selecting which OU's you'd prefer to display
Network Discovery...
Select Options -> Network Options -> Network Discovery... from Manager's menu and the Network Discovery dialog will appear:
This dialog controls how Manager discovers currently running Domain Time components and/or NTP daemons on the local subnet and beyond.
When enabled, Manager broadcasts and/or multicasts a special discovery packet to the network.
Any machine that hears the discovery packet will then respond back via a unicast UDP packet containing its synchronization status
and other data. Broadcasts/Multicasts are sent to the networks indicated on this dialog, using the protocol types selected.
This method only discovers machines that are online and that respond to the discovery packet.
Once machines are discovered, they are added to the Manager's cache list and are thereafter contacted using unicast for most operations.
In addition, as of version 5.2.b.20220414, Manager and Audit Server have the ability to contact Domain Time Servers on other networks and having them
perform a broadcast/multicast scan on Manager's behalf. The remote Domain Time Server(s) must also be running version 5.2.b.20220414 or later, and must have Remote Scan enabled in the Security options.
This is useful in complex networks where broadcast and multicast queries from Manager cannot reach remote subnets. A Domain Time Server positioned on the remote subnet can return a list of nodes visible to it.
See the Remote Scan section below.
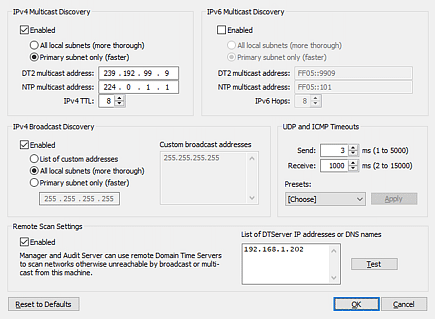
IPv4/IPv6 Multicast Discovery
Domain Time can use multicast to discover Domain Time machines currently online over IPv4 and/or IPv6, both on the local subnet and on remote subnets. This method is preferred over the
older IPv4 Broadcast Discovery method described below.
In order to use this method, your network must be enabled for multicast. You must have multicast-enabled routers/switches configured to allow multicasts sent to port 9909 UDP to
reach all of your subnets. This may also require enabling PIM (Protocol-Independent Multicasts) on all relevant interfaces. Consult your network equipment vendor(s) for configuration details necessary for your environment.
All local subnets (more thorough)
Primary subnet only (faster)
These options select whether the multicast discovery packet is sent out only over the interface the operating system has designated as the primary interface
or through all network interfaces, or whether it is sent to specified remote subnets.
Sending through multiple interfaces also results in longer timeouts and processing overhead to send traffic and listen for responses on each interface.
In general, you will want to send only through the primary interface unless you have machines that cannot be discovered otherwise.
Also, If you have multi-homed machines visible to the Manager on multiple interfaces, sending discovery packets through all interfaces
may result in duplicate responses from those machines.
The DT2 and NTP multicast address boxes indicate the multicast address(es) Manager will send the discovery packet to. Only change these addresses if
you have a compelling reason to do so. Changing these values is usually an error.
The IPv4 TTL: and IPV6 Hops:
entries set how many router hops a multicast packet must cross when propagating through
your network. Choose a value that allows multicasts to reach all of your subnets.
IPv4 Broadcast Discovery
By default, Manager only broadcasts to the local segment. This is an efficient way to discover machines local on local subnets, and you
probably do not want to disable this function entirely. However, using IPv4 Broadcasts to discover machines on remote subnets is recommended only if multicast
discovery is not possible or reliable on your network.
List of custom addresses
All local subnets (more thorough)
Primary subnet only (faster)
These options select whether the broadcast discovery packet is sent out only over the interface the operating system has designated as the primary interface,
through all local network interfaces, or whether it is sent to specified subnets.
Sending through multiple interfaces also results in longer timeouts and processing overhead to send traffic and listen for responses on each interface.
In general, you will want to send only through the primary interface unless you have machines that cannot be discovered otherwise.
Also, If you have multi-homed machines visible to the Manager on multiple interfaces, sending discovery packets through all interfaces
may result in duplicate responses from those machines.
The 255.255.255.255 address is used to broadcast to the primary segment. Only change this address if
you have a compelling reason to do so. Changing this value is usually an error.
Custom Broadcast Addresses
To discover machines on remote subnets, your routers/switches must be configured to allow broadcast traffic using port 9909 UDP to reach each subnet. You must also
select the List of custom addresses radio button and specify the broadcast address for each subnet.
Manager will then send directed broadcasts to the broadcast addresses specified.
This option is provided primarily for backwards-compatibility with versions prior to version 5.1. This method does not scale well and is
unreliable due to firewall/router issues with passing broadcasts between subnets. We recommend you use multicasts to reach remote subnets instead, if possible (see above).
If you do choose to use this option, the 255.255.255.255 entry is used to broadcast to the primary segment.
You should leave this entry in the list unless you have a specific reason to remove it. Then, enter the broadcast address for any other remote subnets
you want to scan via IPv4 broadcast. For example, you would enter 192.168.1.255 as the broadcast address for the 192.168.1.x subnet.
Note about Broadcast Traffic across firewalls
Broadcast traffic typically originates from an ephemeral source port sent to the broadcast address of designated subnets intended for destination
port 9909. Domain Time II components that receive the broadcast then respond via unicast from source port 9909 back to the sending IP address's
ephemeral port. This broadcast discovery process is substantially the same as the process used by DHCP, TFTP, and other standard broadcast
discovery methods.
Stateful firewalls/routers will often require additional configuration to ensure broadcast discovery operates correctly, since unlike normal
unicast UDP communication, the originating traffic is not sent to the same IP address from which the reply will come. Broadcast traffic is
sent to the address xxx.xxx.xxx.255, but the unicast replies from that subnet may come from any (or all) addresses in the range xxx.xxx.xxx.1-254.
Normal stateful firewall rules typically only open the firewall for replies from the same IP address to which the originating traffic was sent,
so even if unicast port 9909 UDP traffic is enabled and working, broadcast traffic may still fail. Therefore, most firewalls have special rules that can be
applied to allow broadcasts to function correctly, (such as ip helper-address, ip directed-broadcast and ip forward-port
functions on Cisco equipment, for example). Check with your firewall manufacturer for the correct broadcast address configuration instructions
for your particular systems.
Remote Scan
There are situations where multicast/broadcast discovery performed from Manager itself is not possible, such as for machines behind firewalls, in DMZs, or when
network policy doesn't permit multicasts or broadcasts beyond Manager's own subnet. In those instances, you can set up a Domain Time Server on the remote subnet
and have it perform the multicast/broadcast discovery on Manager's behalf. Domain Time Server will then report the machines it discovered back to Manager,
which will then populate the database with that information.
Note: Don't enable Remote Scan on Domain Time Servers that are on subnets that Domain Time Manager can already see using its own multicast/broadcast scan.
This will result in Manager receiving duplicate sets of results - one from its own scan, and one from the Domain Time Server. This causes extra overhead and delay
as Manager has to sort out the duplicates.
To enable the Remote Scan feature:
Both Manager and the remote Domain Time Server(s) must be running version 5.2.b.20220414 or later.
Install Domain Time Server on the remote subnets you want to scan.
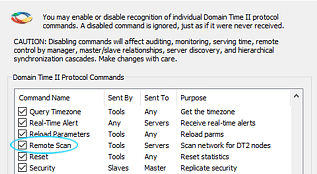
Enable Remote Scan on the Domain Time Server. This is done from the Security property page of the Domain Time Server applet. Click the button
to bring up the Command Restrictions dialog. Check the Remote Scan checkbox.
On Manager, check the Enabled checkbox in the Remote Scan section of the Network Discovery dialog.
Enter the DNS name or IP address of the Domain Time Server(s) that will be acting as the remote scanner(s). Communication between Manager
and the remote scanning Server is done via unicast to port 9909 (UDP and TCP). Click the button to verify the Remote Scan function on the Domain Time Servers is operating correctly.
You can also use the DTCHECK.EXE utility to query Domain Time Servers with Remote Scan enabled to show the results of their discovery scan. This is
another handy way to test to be sure the Server is responding correctly. Issue the following command from an elevated command-prompt:
dtcheck [DNS name or IP address of the remote DT Server] -remotescan
DTCheck will return a list of all machines discovered by that server.
UDP & ICMP Timeouts
UDP packets are subject to numerous possible delays, particularly on busy networks or across slower links. This can cause
some machines to not respond to scans reliably. You may be able to compensate for some of these issues by increasing the
UDP/ICMP Send and Receive values.
If you have configured broadcasts and multicasts correctly, and you know for certain that your routers, firewalls, and switches are configured correctly to pass
the traffic, and yet you are not seeing all of your remote machines, you may need to increase your timeout settings.
The Presets:
drop-down list allows you to quickly pick recommended values for various network configurations. You can use these
values as suggested starting points to adjust your timeouts.
For troubleshooting, you may want to temporarily pick the longest timeout preset (Satellite Link) to eliminate timeouts as a connection issue.
However, in production, set timeouts only long enough to receive responses from all of your systems. Setting too large of a timeout will result in scans
taking an excessively long time to complete.
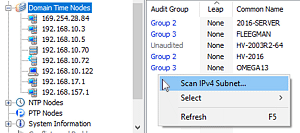
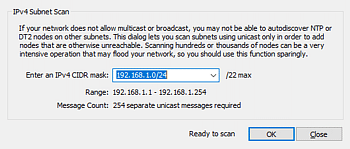
Manually Scan IP4 Subnet
As of v5.2.b.20190701, you may manually scan a selected IPv4 subnet to find machines that might not otherwise answer a multicast or broadcast discovery.
You launch this by right-clicking on a blank part of either the Domain Time Nodes or NTP Nodes list (right-side) and choosing Scan IPv4 Subnet from the context menu.
Caution: Scanning subnets can generate a large amount of traffic, take a significant amount of time, and may cause issues with flooding or violate your network rules. Use with care.
For this reason, the largest subnet scan allowed is a /22.
Scan Options...
If you choose Options -> Network Options -> Scan Options... from Manager's menu, you'll see a dialog with the following settings:
These items control how Manager handles discovery scanning.
If desired, Manager can transmit a special discovery packet to the network (using Multicast and/or IPv4 Broadcast) to locate
existing Domain Time components or NTP daemons. Any machine that hears the discovery packet will then respond back to Manager
via a unicast UDP packet containing its synchronization status and other data. Machines responding to these discovery queries
will populate the Domain Time Nodes and NTP Nodes lists on the Manager Tree pane.
You can choose have Manager run the discovery scan each time it starts. Scans can take quite some time to complete, especially on
large networks, so you may want to run them manually only when needed. Scans can be triggered manually by highlighting the
Domain Time Nodes or NTP Nodes category in the Tree pane and right-clicking to choose Refresh
from the context menu (or Actions -> Refresh from the main menu).
The If a known NTP Node does not respond to _______, try to contact it directly
selections tell Manager to try a unicast time request to determine the status of an NTP machine if the original discovery attempt fails.
This results in more reliable scans, at the cost of slightly more network traffic.