Domain Time II Manager
Version 5.2 |
Using the Manager Interface
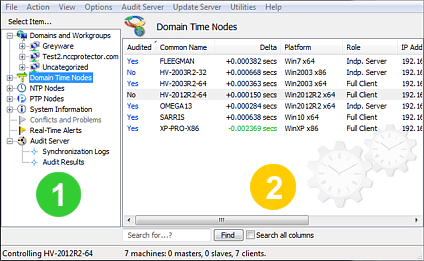
The Domain Time II Manager window is divided into two main Panes:
- The left-hand Pane
 (Tree) contains a selection tree showing
the various machine and report lists. (Tree) contains a selection tree showing
the various machine and report lists.
- The right-hand Pane
 (Details) shows detailed information on the item selected in the
Tree Pane. (Details) shows detailed information on the item selected in the
Tree Pane.
Tree Pane
The Tree Pane consists of three machine lists (four if Audit Server is installed), and several additional informational sections:
 Domains and Workgroups Domains and Workgroups
This is a list of known machines on the network, grouped by domain. This list is useful for identifying machines on which
to install Domain Time for the first time.
The list is derived primarily by enumeration from Active Directory (if available). You can also supplement this list by
enumerating the Windows Networking Browse List. This list will also show any machines running Domain Time discovered by
multicast/broadcast. See the Discovery page for details on how machines are enumerated and
discovered.
Important: This list is semi-persistent.
- Machines enumerated from Active Directory or the Browse List are cached and will persist as long as they continue to be present in those lists.
Manager can be set to automatically remove or tombstone machines that are removed from Active Directory (see Computer List Enumeration for details.
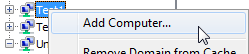 Machines not automatically enumerated or discovered can be manually added to individual domains this list.
To manually add a machine, highlight the desired domain in the Tree and right-click to select Add Computer… from the context menu. Manually-added machines will persist until manually removed.
Machines not automatically enumerated or discovered can be manually added to individual domains this list.
To manually add a machine, highlight the desired domain in the Tree and right-click to select Add Computer… from the context menu. Manually-added machines will persist until manually removed.
- Machines may be manually removed from the list by expanding the tree list in the left-hand column (or in the right-hand column in recent versions),
then right-clicking the the machine name and choosing Remove from cache from the context menu. However, if the machine is
rediscovered/re-enumerated by any discovery method, it will reappear in the list.
- Large numbers of machines may be added or removed from the cache using batch files (see the Batch Add section below)
- Any machine marked as Audited (if Audit Server is installed)
will persist, even if the machine is later removed from Active Directory or it disappears from the Browse list.
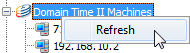
- To rediscover/re-enumerate machines in a particular category, highlight the category in the Tree and choose Action ->
Refresh from the menu or right-click and choose Refresh from the context menu. To rediscover/re-enumerate all
machines, highlight the top-level Domains and Workgroups item and choose Refresh.
Unknown, Uncategorized, and Hidden machines
Machines will show up in this list as unknown (greyed-out) if it cannot be determined that Domain Time is present on the
machine (such as if the Domain Time service is not installed, not started, not responding to multicast/broadcast discovery,
etc.). If the machine is later determined to be running Domain Time, the details for this machine will be updated and the
icon will change to show the running Domain Time machine type.
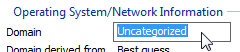 Manager makes a best-guess at categorizing machines into their proper domain. If the domain cannot be identified, machines
will be listed as Uncategorized. A machine can be moved manually to any domain category by highlighting it in the Tree,
then double-click to edit the Domain field on its Details Pane.
Manager makes a best-guess at categorizing machines into their proper domain. If the domain cannot be identified, machines
will be listed as Uncategorized. A machine can be moved manually to any domain category by highlighting it in the Tree,
then double-click to edit the Domain field on its Details Pane.
You may choose to hide machines on the list by right-clicking the computer name in the Tree and choosing Hide
Computer from the context menu (or by double-clicking the Hidden editable field on the
machine's Details pane).
You can toggle whether to temporarily display all hidden machines by selecting the
Show Hidden Computers item on the View menu. Hidden machines displayed this way will be shown with a
strikethrough font in the Tree list.
If you want to reset the hidden flag on all systems to the
default setting, choose View -> Unhide all Hidden Computers from the menu.
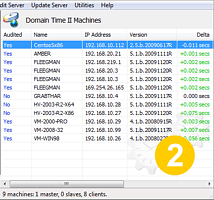
 Domain Time Nodes Domain Time Nodes
This list shows all machines discovered to be up and running Domain Time when the list was last refreshed. This list is useful
for showing current variances, statistics, and other Domain Time-specific information.
You cannot manually add machines to this list. The machines that appear in this list are discovered either by multicast or broadcast scans.
To configure Network Discovery, right click the Domain Time Nodes category and choose Configure from the context menu.
 Important: This list is not persistent. It will be updated each time the program is started (if desired, see the Scan Options page)
or when the list is manually refreshed. To refresh the list, highlight the Domain Time Nodes category in the Tree and choose Action -> Refresh from the
menu or right-click and choose Refresh from the context menu.
Important: This list is not persistent. It will be updated each time the program is started (if desired, see the Scan Options page)
or when the list is manually refreshed. To refresh the list, highlight the Domain Time Nodes category in the Tree and choose Action -> Refresh from the
menu or right-click and choose Refresh from the context menu.
If a new Domain Time II machine is found by multicast/broadcast, it will appear in this list and also be added automatically to
the Domains and Workgroups list above. If a record already exists for the machine there, it will be updated with current
information. Note, although you may mark a machine as Audited on the Details pane for a machine in this
list (assuming you have Audit Server installed), the record for the machine will only persist in the Domains and Workgroups list.
As of v5.2.b.20190701, you may also manually scan IPv4 subnets for machines not discovered by multicast or broadcast. See Manually Scan Ip4 Subnet for details.
It's quite possible to get multiple entries on this list from a single machine, since there may be more than one IP address and more than one Domain Time Component
installed on a machine. Each of these may send a reply to the discovery packets, resulting in duplicated entries. You can toggle whether to
show all responses or hide the duplicated items by clicking the Show Duplicate DT2 Responses item on the View menu.
 NTP Nodes NTP Nodes
This list shows all machines that respond to standard NTP time requests that have been discovered by multicast/broadcast or that were manually added to Manager. This includes
machines running ntpd or chrony on Linux, or other NTP daemons on other platforms. Even Domain Time Servers that have NTP enabled will appear on this list.
This list is useful for displaying the current variance of your NTP machines, and to select which NTP machines to audit (if you have Audit Server installed).
Important: The list is always persistent. No machines will be removed unless you manually delete them.
Machines newly discovered by multicast/broadcast will be added each time the program is started (if desired, see the Scan Options page)
or when the list is manually refreshed. To trigger a new discovery scan, highlight the category in the Tree and choose Action ->
Refresh from the menu or right-click and choose Refresh from the context menu.
To configure Network Discovery, right click the NTP Nodes category and choose Configure from the context menu.
As of v5.2.b.20190701, you may also manually scan IPv4 subnets for machines not discovered by multicast or broadcast. See Manually Scan Ip4 Subnet for details.
To manually add single NTP machines to the list, highlight the NTP Nodes category in the Tree pane, then right-click to select
Add NTP Node… from the context menu. Enter the DNS Name or IP address of the NTP Node on the Add Machine dialog.
Large numbers of machines may be added or removed from the cache using batch files (see the Batch Add section below)
 PTP Nodes PTP Nodes
As of version 5.2.b.20170101, this category will appear when Audit Server is installed. If PTP Monitor is enabled (it is off by default), this list shows
all PTP nodes discovered by Audit Server's powerful PTP Monitor process. Using PTP Monitor, you may discover, audit, and track the availability
of virtually any PTP device on your network, regardless of platform or manufacturer. Read more about PTP Monitor.
This list is useful for displaying the current node identifying information, time deltas, up state, and to select
which nodes to audit. Right-click the column titles to customize which information is displayed in the list.
Newly discovered nodes will be added each time Manager is started, when the list is manually refreshed.,
or when an audit runs. Discovery sweeps may also be set to run on a regular basis if desired, see the
PTP Monitor Configuration page.
Important: This list is persistent. Machines will not be removed unless you manually delete them, or if you have enabled auto-removal
of non-responding nodes on the Configuration page.
 System Information System Information
Click this category in the Tree to show important information about the system running Domain Time II Manager (this is also
the same information shown when you select Help -> About Domain Time II Manager... from the menu).
There are two other items contained in the System Information category:
 Reference Time shows the current status of the reference clocks selected on the Options -> Reference Time page.
Click here for more information on configuring Manager's Reference Time. Reference Time shows the current status of the reference clocks selected on the Options -> Reference Time page.
Click here for more information on configuring Manager's Reference Time.
License Report shows the license status of all known Domain Time components.
The remaining time on any evaluation versions will be displayed, otherwise machines will be shown as registered, along with their
current version information and install dates.
Summary information displaying the totals of each type of license appears on the status bar
on the bottom of the Manager window.
You may export this report using the File -> Export List... command on the menu.
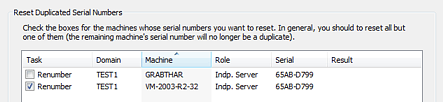
 Conflicts and Problems Conflicts and Problems
Items will appear in this category if a problem is detected by Manager.
For example, a conflict will be flagged if Domain Time machines are detected running with the same Domain Time serial number.
Domain Time serial numbers must be unique.
In most cases, you can resolve the conflict by highlighting the conflict item
 in the Tree and
double-clicking the Repair link on the Details Pane. This will bring up the Reset Duplicated Serial Numbers dialog which lets
you select which machines to renumber. in the Tree and
double-clicking the Repair link on the Details Pane. This will bring up the Reset Duplicated Serial Numbers dialog which lets
you select which machines to renumber.
If you are unable to correct the conflict using this utility, you will need to manually correct the serial number on the machines:
- On Windows machines, run the following command as administrator from the command-prompt on one of the affected machines:
- On Linux machines running DTLinux, issue the following command as su or root:
- On Linux and UNIX machines running domtimed (discontinued), the serial number is derived from the HOSTID variable. Each flavor of 'nix sets this value in its own way; you will need to research how to change the HOSTID value for your particular system.
 Real-Time Alerts Real-Time Alerts
This category shows you any Real-Time Alerts reported from Servers and Clients. Real-Time Alerts are configured and collected by Audit Server.
 Audit Server Audit Server
If you have installed Audit Server, this category will appear and show you summary information about the service.
There are two other items contained in the Audit Server category:
Synchronization logs shows you all machines for which you have collected Synchronization (Drift) Logs. You can double-click on the machine's name in the Details Pane to display its Drift Graph.
You can also see this information from the Audit Server -> Synchronization Logs menu item. You can also Right-click to choose Open Containing Folder
from the context menu if you want to browse the actual log files using Windows Explorer.
Audit Results shows a list of the most recent audit runs. Double-click the name of the audit in the Details Pane to display the complete Audit Record.
The number of results shown is configurable using the Options -> Appearance and Interface -> Interface Options menu item.
You can also Right-click to choose Open Containing Folder from the context menu if you want to browse all of the audit results files using Windows Explorer.
Details Pane
The Details Pane will change to display information on the item selected on the Tree Pane.
If the selected Tree item is a single machine or topic, individual statistics and information about that machine will be
shown.
Information in the displayed Details Pane can be updated by clicking Action -> Refresh from the menu or by right-
clicking and choosing Refresh from the context menu.
If the Tree item is a category that contains multiple items, you’ll see either summary information or a table display showing
the items.
You can also control how Manager displays items, fields, and lists using the Options -> Appearance and Interface menu item.
Layout
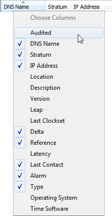
Table displays are highly customizable. You can control which columns are displayed, and in what order. You can also sort
the table list by any column, making it very easy to see all the machines running a particular version, which machine has the
worst variance, etc.
To change which columns are displayed, right-click on any column header. You can pick from a list of all available columns.
To re-arrange the order of displayed columns, grab the column header and drag it to the desired position. Manager will
remember your selections.
To sort a column, just click on its column header. Click again to change the sort order.
You may reset any view to the default settings by selecting the View -> Reset Column Layout from the menu. You may reset individual
views or reset all views.
Editable Items
The Details Pane will often contain fields that can be edited for selected machines, such as whether a machine is Audited (if
Audit Server is installed), Hidden, etc. You may also
change a machine's domain name, DNS name, location (if an NTP Node), etc. You can edit these fields by double-clicking them (this default behavior may be
modified to be done via a single-click on the Options -> User Interface Settings menu page).
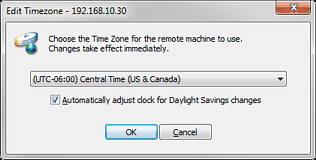
Here’s an example of changing the timezone of a machine remotely by editing its Details record:
Editable items are shown in the color selected for them on the Options -> Appearance and Interface -> Interface Colors page.
Export List
Most displays in the Details pane can be exported to a file using File -> Export List... from the main menu.
For example, you could export the current list of NTP Nodes to a comma-delimited text file (.CSV extension) for later import
into a database, or export the License Report to an XML file for use in Excel, etc.
Exports can include only the visible columns in the Details pane, which allows you to easily select which data to include, or
you may choose to include hidden columns as well (there is a checkbox for this on the Save As dialog).
You may export to CSV (comma-separated value), XML, or HTML formatted files.
Other Items
Backup/Restore Database
As of version 5.2, Manager can backup and restore its database using the File -> Backup Database and File -> Restore Database commands from the main menu.
You may choose to save the backup files in any file location you want, however, any files you want to restore must be located in the \Program Files\Domain Time II\Backups folder on your system drive.
Database backups are not intended as comprehensive disaster recovery files. Database backups only include information related to individual machines, such as whether particular machines are
audited, machine type, etc. The backups do not include information that is kept in the registry, such as Manager's own settings, or Audit Server schedules, alert settings, email configuration, etc.
Backups are primarily for making working copies of the database, such as when making large-scale changes or transporting audit lists to another Manager/Audit Server.
Backup/Restore Audit List and Audit Group settings
As of version 5.2.b.20180606, Manager can backup and restore Audit list and group configuration settings using the File -> Audit List and Audit Group settings and File -> Restore Audit List and Audit Group settings commands from the main menu.
You may choose to save the backup files in any file location you want, however, any files you want to restore must be located in the \Program Files\Domain Time II\AuditList folder on your system drive.
Audit list and group settings backups are not intended as comprehensive disaster recovery files. They only include the limited set of current audit lists and group alerting settings.
Backups are primarily for making working copies of the audit settings, such as when making large-scale changes or transporting audit lists to another Manager/Audit Server.
Batch Add
Manager also allows you to add/remove machines in a batch from a text file. This is done by entering the following command from the command-line:
dtman import [full path]\filename.txt
The %ERRORLEVEL% result is zero if the file was parsed without errors or
warnings. If %ERRORLEVEL% is non-zero, you should examine the Manager logs (Options -> View Log File from the Manager menu,
or open \Program Files\Domain Time II\Text Logs\Manager.log with a text editor)
to see the errors or warning messages.
The text file format is very simple:
SYNTAX: [add|drop|delete] [dt2|ntp|ptp|all] [ipaddress|name] (ipaddress|name[:domain] for ptp) [AuditGroup]
add all [AuditGroup]
| - sets any existing unaudited machine to audited
|
add ntp identifier [AuditGroup]
| - adds NTP machine to the database and sets it to audited
|
add dt2 identifier [AuditGroup]
| - adds DT2 machine to the database and sets it to audited |
add ptp identifier[:domain] [AuditGroup]
| - adds a PTP machine to the database and sets it to audited |
drop all
| - sets any existing audited machine to unaudited
|
drop ntp ipaddress
| - sets existing NTP machine to unaudited
|
drop dt2 netbiosname
| - sets existing DT2 machine to unaudited |
drop ptp ipaddress
| - sets existing PTP machine to unaudited |
del all
| - removes all records from the database
|
del ntp ipaddress
| - removes existing NTP machine from the database
|
del dt2 netbiosname
| - removes existing DT2 machine from the database |
del ptp ipaddress
| - removes existing PTP machine from the database |
AuditGroup is an optional parameter for ADD. If present, it must come after the identifier , and
be a single-digit number 1-8, corresponding to the audit group to which you want the node added. As of version 5.2.20200405, you may specify
0 (zero) to mean you want the node unaudited. If you do not specify an AuditGroup, the default group number will be used.
Adding an NTP or DT2 machine (or setting an existing machine to audited) can use
any kind of identifier that resolves to an IP address. You may use a plain
NetBIOS name, an IP address, or a DNS name.
Batch add for PTP nodes (included as of v5.2.b.20180606) is limited to unicast-only slaves. You may use either an IP address
or a DNS name as the identifier ,
optionally followed by a colon and a PTP domain number. For example, ADD PTP 192.168.1.200:3 would add the PTP slave at
192.168.1.200, using domain 3. If you leave the colon and domain number off, Manager will attempt to discover the domain.
If you specify a domain number that isn't one of the ones being monitored by PTP Monitor, the node won't be added.
If the node already exists in the database but with a different domain number, the domain number will be updated to the
one you specify. if multiple PTP nodes reside at a single IP address, Manager will add all discovered nodes. Note: This also
applies to the drop and del commands, so use them carefully.
Dropping or deleting machines, however, requires that you use the exact name by
which the machine is known to the database. For NTP and PTP machines, this is the
IP address (either IPv4 or IPv6). For DT2 machines, this is the NetBIOS name.
CAUTION:
Use the all options with great care, particularly the drop all command.
Batch imports take effect immediately and cannot be undone.
Comment lines are ignored. A comment line is any line whose first
non-whitespace character is a pound sign (#), a glitch ('), a slash
(/), or a semicolon (;). Blank lines are also ignored.
The text file should be CRLF terminated. If you are importing from
a *nix operating system, be sure to transform the line terminators to
full CRLFs.
Example import file:
#
# this is an example
#

add     ntp    tick.mydomain.com
add     dt2    PDC01
add     dt2    pdc02.south.brooklyn.ny.company.com
drop    dt2    pdc03
add     ntp    ntp2.ourpool.org
add     ptp    192.168.1.200:3
delete  dt2    pdc04
delete  ntp    tock.mydomain.com

#
# end of list
#
 Proceed to the How to Manage Domain Time Remotely page Proceed to the How to Manage Domain Time Remotely page
 Back to the Domain Time II Manager page Back to the Domain Time II Manager page
|
|