Use the Setup page to configure important Domain Time II Monitor Service settings.
The Schedule section controls which functions Monitor performs on a regular basis, as well as notification email configuration.
The Monitor should check the network
drop-down list sets how often the service will run a network scan.* Choose a schedule that gives you
the level of surveillance of your Domain Time machines you desire.
When a scan is run, Monitor sends a discovery packet to the network (see the Discovery section below).
Any Domain Time Server or Client that hears the discovery packet responds to the Monitor machine with its
current sync information.
Each time the scan is run, the results are analyzed to be sure all of the responding machines meet your alert
criteria (see the Alerts tab page to set your alert definitions).
Note:
Only machines that are running at the time of the scan will be included in the Monitor scan results. In addition, transient network issues
may prevent UDP packet responses from being received reliably.
Domain Time Audit Server is a much more robust solution, and offers many additional
monitoring and alerting functions than does Monitor Service. This includes persistent contact lists (status of both on- and off-line machines),
monitoring of NTP daemons, real-time alarms, more complete historical record keeping, etc. You should only use Monitor for quick snapshots and
"heads-up" alerting. Use Audit Server for more critical tasks.
* You may run a scan manually by clicking the Rescan Now button on the Status tab page.
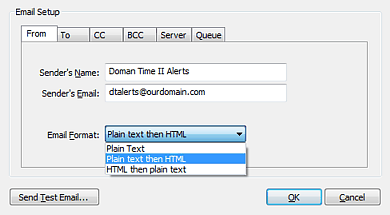
Send email summaries
Include all detail records
Include only error details
No detail records
Use these controls to determine whether and how often to receive summary email reports of the Monitor Service scan activity.
You can also select which level of detail you want included in the email. See the sample report below for an example of
what's included in the summary section and in the optional detail records.
Domain Time II Monitor Summary Report
  Report Date:     Sun 18 Oct 2009 00:00:39
  Scan machine:    FLEEGMAN
  Email Alerts:    Enabled
  Event Viewer:    Enabled
  First Scan:      Sat 17 Oct 2009 02:22:20
  Last Scan:       Sat 17 Oct 2009 20:20:17
  Period Covered:  17 hours, 57 minutes
  Detail Records:  All (see below)
  Total Scans:     1
  Scan Errors:     0
  Tests Passed:    9 of 9
  Tests Failed:    0 of 9
 Average Delta:    - 00 000 00:00:00.071

Detail Record 1 of 1

          Scan Status: Passed
            Scan Time: Sat 17 Oct 2009 07:22:20 UTC
                       Sat 17 Oct 2009 02:22:20 (local)
 Reference Clock Type: This machine's sources (averaged)
 Reference Clock Time: Sat Oct 17 2009 02:22:19
     Reference Source: server tick.greyware.com protocol DT2-UDP samples 3
     Reference Offset: -0.2964544 seconds

  Type and average delta   yy ddd hh:mm:ss.mss
  -----------------------  -- --- ------------
    Clients:         3   - 00 000 00:00:00.119
    Total:           3   - 00 000 00:00:00.119

  Slowest Clock: Sat Oct 17 2009 07:22:19.972 UTC  192.168.10.2 (OMEGA13)

  Fastest Clock: Sat Oct 17 2009 07:22:19.972 UTC  192.168.10.4 (Grabthar)

  Worst Client:  + 00 000 00:00:00.371   192.168.10.2 (OMEGA13)

  Master/Slave Test:   Limit: 500 ms       Slave Var: + 00 000 00:00:00.000   Test Passed
  Single Machine Test: Limit: 1000 ms      Worst Var: + 00 000 00:00:00.371   Test Passed
  Avg Variance Test:   Limit: 750 ms       Total Var: - 00 000 00:00:00.119   Test Passed

  INDIVIDUAL VARIANCES (sorted by variance)

    - 00 000 00:00:00.371          Full Client         192.168.10.2 (OMEGA13)
    + 00 000 00:00:00.000          Full Client         192.168.10.28 (HV-2003-R2-X64)
    + 00 000 00:00:00.013          Full Client         192.168.10.4 (Grabthar)


End of Summary Report
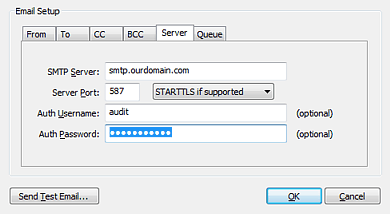
Enter the server address and account login information required for Monitor Service to send outgoing mail through your SMTP server.
Send Test Email
Once you have entered all of the above information, click the Send Test Email button to generate a test email.
If your test email encounters any errors, you'll receive a pop-up window showing the entire SMTP conversation so
you can easily troubleshoot the problem:
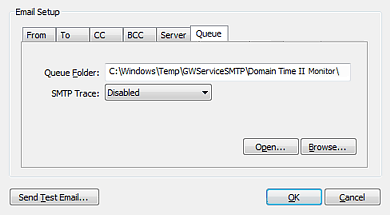
This page contains the settings for the email queue and email logs.
The Queue Folder: specifies the location of the folder where outgoing emails are queued.
The email.log trace file is also kept in this folder.
Note: In most cases, you will not need to adjust this location. If you do decide to change the folder location, you must
pick a location on a local disk (not a networked share) with sufficient permissions (Change) granted to the
Monitor Service service account so that it is able to manage the queues.
Use the SMTP Trace:
drop-down list to select the level of detail you want to keep in the email.log trace file.
In general, you should only enable the trace file if you are troubleshooting an email delivery issue. Otherwise, your
email.log file may grow to an unmanageable size over time.
Use the Open or Browse buttons to open the queue folder and locate the email.log file, which
is a plain text file you can open in any editor, such as Notepad.
Advanced Configuration: Email-related registry settings
Depending on your email server configuration, you may also need to adjust these additional settings in the Windows registry.
Email registry settings are located in the
HKEY_CLASSES_ROOT\Gap\GWServiceSMTP key.
TLSIgnoreCertErrors (REG_DWORD)
Introduced in v5.2.b.20140922 with default=0 (ignore no errors). As of v5.2.b.20160711, the default changed to 0x311 (accept certs that are self-signed, expired, or have the wrong CN)
If this value is zero, the server cert must pass all tests. If the value is non-zero, it is a bitmask specifying which
particular types of errors may be ignored. See Microsoft's documentation
for a list of certificate errors that may be ignored. Use a logical OR to combine multiple values.
0x00000080 - Ignore errors associated with certificate revocation
0x00000100 - Ignore errors associated with an unknown (or self-signed) certificate authority
0x00000200 - Ignore errors associated with wrong use of a certificate
0x00001000 - Ignore errors associated with an invalid/mismatched common name
0x00002000 - Ignore errors associated with an expired certificate
You may set the value to 0x10000000 in order to regain strict certificate checking, 0x0000FFFF to disable certificate checking altogether, or any combination of the above values.
TLSAcceptableProtocols (REG_DWORD)
Introduced in v5.2.b.20160711. This is a bitmask of acceptable encryption protocols.
The default value is 0x0AA0. Use a logical OR to combine multiple values.
0x00000002 - PTC1 (not recommended)
0x00000008 - SSL2 (not recommended)
0x00000020 - SSL3 (not recommended, but included in default for backward compatibility)
0x00000080 - TLS 1.0 (not recommended, but included in default for backward compatibility)
0x00000200 - TLS 1.1
0x00000800 - TLS 1.2
0xFFFFFFFF - any available protocol (not recommended)
FQDN (REG_SZ)
Introduced in v5.2.b.20160711. This value contains the name to use during SMTP envelope negotiations; specifically, it is the name presented as the
HELO or EHLO name immediately after receiving the server's greeting.
In previous versions, the name used was the sending machine's fully-qualified
host name. However, workgroup members or machines just starting may only have a bald hostname available. This new value is set the
first time an email is sent, and used thereafter for all subsequent emails. If a fully-qualified name is not discoverable,
then Domain Time will use either a dotted-quad IP enclosed in brackets, or the computer name followed by .smtp.local.
RFC 2821 section 4.1.1.1 requires one of these two forms. You may change the name if your particular email server requires
an externally-verifiable DNS name to be presented.
The Network Settings section allows you to choose whether or not Monitor should use Manager's settings for Network Discovery
and Reference Clock or to set these items independently.
Network Discovery
If you choose Customize, you can pull up Monitor's Network Discovery dialog by clicking the
button.
This dialog controls how Monitor Service discovers currently running Domain Time components on the local subnet and beyond.
When enabled, Monitor Service broadcasts and/or multicasts a special discovery packet to the network.
Any machine that hears the discovery packet will then respond back via a unicast UDP packet containing its synchronization status
and other data. Broadcasts/Multicasts are sent to the networks indicated on this dialog, using the protocol types selected.
This method only discovers machines that are online and that respond to the discovery packet.
Note: Although NTP broadcast/multicast addresses are listed on this dialog, the Monitor Service only uses the DT2 protocol settings and only discovers
Domain Time machines.
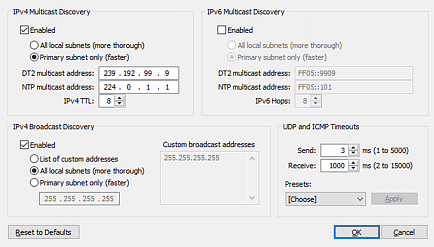
IPv4/IPv6 Multicast Discovery
Domain Time can use multicast to discover Domain Time machines currently online over IPv4 and/or IPv6, both on the local subnet and on remote subnets. This method is preferred over the
older IPv4 Broadcast Discovery method described below.
In order to use this method, your network must be enabled for multicast. You must have multicast-enabled routers/switches configured to allow multicasts sent to port 9909 UDP to
reach all of your subnets. This may also require enabling PIM (Protocol-Independent Multicasts) on all relevant interfaces. Consult your network equipment vendor(s) for configuration details necessary for your environment.
All local subnets (more thorough)
Primary subnet only (faster)
These options select whether the multicast discovery packet is sent out only over the interface the operating system has designated as the primary interface
or through all network interfaces, or whether it is sent to specified remote subnets.
Sending through multiple interfaces also results in longer timeouts and processing overhead to send traffic and listen for responses on each interface.
In general, you will want to send only through the primary interface unless you have machines that cannot be discovered otherwise.
Also, If you have multi-homed machines visible to the Monitor Service on multiple interfaces, sending discovery packets through all interfaces
may result in duplicate responses from those machines.
The DT2 and NTP multicast address boxes indicate the multicast address(es) Monitor Service will send the discovery packet to. Only change these addresses if
you have a compelling reason to do so. Changing these values is usually an error.
The IPv4 TTL: and IPV6 Hops:
entries set how many router hops a multicast packet must cross when propagating through
your network. Choose a value that allows multicasts to reach all of your subnets.
IPv4 Broadcast Discovery
By default, Monitor Service only broadcasts to the local segment. This is an efficient way to discover machines local on local subnets, and you
probably do not want to disable this function entirely. However, using IPv4 Broadcasts to discover machines on remote subnets is recommended only if multicast
discovery is not possible or reliable on your network.
List of custom addresses
All local subnets (more thorough)
Primary subnet only (faster)
These options select whether the broadcast discovery packet is sent out only over the interface the operating system has designated as the primary interface,
through all local network interfaces, or whether it is sent to specified subnets.
Sending through multiple interfaces also results in longer timeouts and processing overhead to send traffic and listen for responses on each interface.
In general, you will want to send only through the primary interface unless you have machines that cannot be discovered otherwise.
Also, If you have multi-homed machines visible to the Monitor Service on multiple interfaces, sending discovery packets through all interfaces
may result in duplicate responses from those machines.
The 255.255.255.255 address is used to broadcast to the primary segment. Only change this address if
you have a compelling reason to do so. Changing this value is usually an error.
Custom Broadcast Addresses
To discover machines on remote subnets, your routers/switches must be configured to allow broadcast traffic using port 9909 UDP to reach each subnet. You must also
select the List of custom addresses radio button and specify the broadcast address for each subnet.
Monitor Service will then send directed broadcasts to the broadcast addresses specified.
This option is provided primarily for backwards-compatibility with versions prior to version 5.1. This method does not scale well and is
unreliable due to firewall/router issues with passing broadcasts between subnets. We recommend you use multicasts to reach remote subnets instead, if possible (see above).
If you do choose to use this option, the 255.255.255.255 entry is used to broadcast to the primary segment.
You should leave this entry in the list unless you have a specific reason to remove it. Then, enter the broadcast address for any other remote subnets
you want to scan via IPv4 broadcast. For example, you would enter 192.168.1.255 as the broadcast address for the 192.168.1.x subnet.
Note about Broadcast Traffic across firewalls
Broadcast traffic typically originates from an ephemeral source port sent to the broadcast address of designated subnets intended for destination
port 9909. Domain Time II components that receive the broadcast then respond via unicast from source port 9909 back to the sending IP address's
ephemeral port. This broadcast discovery process is substantially the same as the process used by DHCP, TFTP, and other standard broadcast
discovery methods.
Stateful firewalls/routers will often require additional configuration to ensure broadcast discovery operates correctly, since unlike normal
unicast UDP communication, the originating traffic is not sent to the same IP address from which the reply will come. Broadcast traffic is
sent to the address xxx.xxx.xxx.255, but the unicast replies from that subnet may come from any (or all) addresses in the range xxx.xxx.xxx.1-254.
Normal stateful firewall rules typically only open the firewall for replies from the same IP address to which the originating traffic was sent,
so even if unicast port 9909 UDP traffic is enabled and working, broadcast traffic may still fail. Therefore, most firewalls have special rules that can be
applied to allow broadcasts to function correctly, (such as ip helper-address, ip directed-broadcast and ip forward-port
functions on Cisco equipment, for example). Check with your firewall manufacturer for the correct broadcast address configuration instructions
for your particular systems.
UDP & ICMP Timeouts
UDP packets are subject to numerous possible delays, particularly on busy networks or across slower links. This can cause
some machines to not respond to scans reliably. You may be able to compensate for some of these issues by increasing the
UDP/ICMP Send and Receive values.
If you have configured broadcasts and multicasts correctly, and you know for certain that your routers, firewalls, and switches are configured correctly to pass
the traffic, and yet you are not seeing all of your remote machines, you may need to increase your timeout settings.
The Presets:
drop-down list allows you to quickly pick recommended values for various network configurations. You can use these
values as suggested starting points to adjust your timeouts.
For troubleshooting, you may want to temporarily pick the longest timeout preset (Satellite Link) to eliminate timeouts as a connection issue.
However, in production, set timeouts only long enough to receive responses from all of your systems. Setting too large of a timeout will result in scans
taking an excessively long time to complete.
If, after adjusting the broadcast/multicast addresses and timeouts, you still encounter issues with seeing all of your remote systems,
you should consider using Audit Server instead. Audit Server uses a persistent
list of machines with more robust unicast communication to be sure remote machines are reachable.
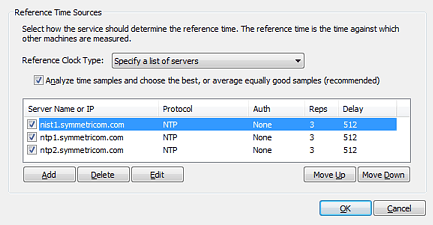
Reference Clock
Specify the reference time that Monitor will use to compare against all sampled machines by clicking the button.
All variances and alert thresholds will be calculated from this time.
Important: Stable reference time is critical to obtaining trustworthy
variance data from your network. Choose sources that are known to be reliable and available over low-latency connections.
The Reference Clock Type:
list gives you multiple options for obtaining reference time:
Use this machine's clock
The local machine's clock is used as the reference. Use this setting if the local time
on your machine is being well-corrected by a reliable process such
as an internal GPS clock card. On versions prior to 5.2.b.20240425, this would be the selection to choose
if your Domain Time Server or Client is synchronizing using PTP. If using PTP on newer versions, choose Use this machine's sources (see below).
Use this machine's sources
When selected, Monitor Service will use the same time sources used by the Domain Time Server or Client installed
on the local machine. This is an excellent option if you have already configured the local Domain Time Server to obtain
time from reliable sources using PTP, NTP or DT2 protocols.
Specify a list of servers
Use this option to specify the exact machines you want to use for your reference time. Note, you cannot specify PTP sources
using this option. If you are using PTP, configure Domain Time Server with your list of sources and choose the
Use this machine's sources option above.
Discover DT2 server(s)
Discover NTP server(s)
Discover any available server(s)
The auto-discovery options allows Monitor Service to locate available servers of the selected type on the network. Discovery will
use all discovered servers if the Analyze all listed servers and choose the best... checkbox is checked, otherwise it will
use the first discovered server.
Note: To avoid the possibility of inadvertently using a free-running local clock, the discovery process will not use the local machine,
even if the local machine is a time server.
Analyze time samples and choose the best, or average equally good samples (recommended)
This controls whether Monitor Service applies advanced analysis algorithms to the collected time samples.
When this box is checked, Monitor Service contacts all of the listed servers to collect a group of time samples. It then performs
statistical analysis on the collected samples to determine the reliability and uses the most reliable samples to derives the correct time.
See the About Time Samples sidebar for more information and rule-of-thumb suggestions on acquiring time samples.
If you are collecting multiple samples, checking this box will almost always improve your reference time's accuracy and reliability.
If this box is unchecked, no comparative analysis among samples is performed. In addition, the list of time servers to query becomes a fallback-only list.
In other words, Monitor Service will only contact first listed time server. This server will always be used unless it is unavailable, at which point the
next listed server will be used. If that server is unavailable, the next server in the list will be tried, etc. When the first listed server becomes available again,
the Server will revert to using it exclusively.
The Saved Histories settings control how saved scan results are displayed on the History tab page,
and how many scan results to keep at any one time.
The amount of disk space used by your stored scan results varies significantly based on how many machines are scanned and how
often scans are run. Monitor keeps a maximum of 999 scans, but you can reduce this amount if you have disk constraints.