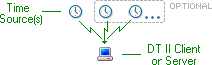
Stand-Alone Single Machine Model
A machine that is not part of a domain.
Domain Time II running on any stand-alone machine should be manually configured to get its time from trusted sources.
Installation Plan:
(click the link to get detailed instructions for each component listed)
- Install Domain Time II Server or Client.
- Configure it to get time from your chosen time source(s).
|
 |
Workgroup Model
For networks without a Windows domain controller.
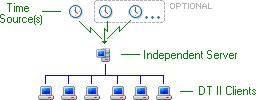
In a small workgroup without a Windows domain, one machine should run Domain Time Server. It will be configured to get its time
from trusted sources and distribute it to clients on the network.
All other Windows machines on the network should run Domain Time II Client. Client can be set to either use the specific IP address
or DNS name of the Server or automatically discover the time server. You may choose from the following options:
Any other time-capable machines and devices should be configured to get their time from the Server using
whatever time protocol they use (such as NTP, TIME/ITP, etc.)
Installation Plan:
(click the link to get detailed instructions for each component listed)
- Install Domain Time II Server.
- Configure the Server to get its time from your chosen time source(s).
- Install Client on all other Windows machines. Configure
the Clients for either automatic discovery or manually select their time sources.
- Configure any third-party clients or devices on the network to get their time from the Domain Time II Server.
Single Domain Model
Networks with a single Windows domain (or single Active Directory Tree).
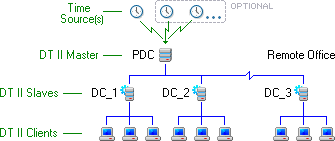 Domain Controllers should run Domain Time Server.
The machine holding the PDC-Emulator role (FSMO) automatically becomes the Master server and should be configured to
obtain the time from trusted time sources. Domain Time Server installed on all other DCs automatically
becomes a Slave to the Master. You may also set any other Domain Time Server on the domain to be a Slave. Slaves provide for important
redundancy and efficient distribution of time. See the Domain Role page for more info.
Install Domain Time Client on all other Windows servers and workstations on the network. Client can be set to either use specific time sources or
automatically discover time servers. Clients automatically acquire important redundancy and failover advantages when Masters and Slaves are present on the domain,
regardless of which configuration options are selected.
You may choose from the following configuration options on Clients:
- Manually configure the Client to specify which Servers to use.
- Set the Client to Discover sources automatically using Broadcast/Multicast.
See the Discovery page for more information.
- Set the Client to Discover sources automatically using DHCP.
Client will use time servers listed in DHCP Time Server options.
Machines do not need to use DHCP for ip-address assignment to be able to get time server addresses from DHCP servers.
See the Discovery page for more information.
- You may also use Active Directory policies to specify which Servers the Clients should use. Active Directory
policies override any other settings you make on the Client.
Configure any other time-capable machines and devices to get their time from the nearest Domain Time Slave Server.
Note: Server and Client settings can be pre-configured and rolled-out to multiple machines using Domain Time Manager.
See
Network Rollout for details.
Installation Plan:
(click the link to get detailed instructions for each component listed)
- If you will be using Active Directory policies to specify Domain Time settings, Use your Group Policy Management Editor to
install the domtime.adm policy file from the distribution files as a template into the Computer Configuration\Policies\Administrative Templates section of your
desired Group Policy object(s). Then, configure the settings for each Domain Time policy item you want to apply to that object.
- If you will be using DHCP to specify time servers for your Clients to use, configure Option 004 of your DHCP servers to provide the IP address(es)
of the desired Domain Time II Server(s) or Option 024 to specify NTP servers.
- Use Setup to install both Domain Time II Server
and the Management Tools on any machine you want to use as
your management workstation. If you will be using Audit Server,
install it on this machine also. (Each instance of Server, Manager and Audit Server requires a separate license)
- Use Manager to perform each of the following steps from your management workstation:
- Install Server on the PDC/FSMO (It will assume the Master role).
Configure the Master to get its time from your chosen trusted time source(s).
Server averaging ("Analyze all listed servers and choose the best...") should be enabled.
- Install Server on all other DCs (they will automatically assume the Slave role).
- If you want to pre-configure your Client installation settings for network rollout:
- Install Client on a test machine to prepare an installation template .reg file for Manager to use.
- Connect to the Client's Control Panel applet to set up the Client exactly the way you want it to be configured.
- Use the Client's Import/Export utility to export the Client settings to a
.reg file. Copy the the .reg file to the Manager's Program Files\Domain Time II folder to be available as a template for installation.
- Install Client on all other Windows machines. Select the template .reg file if you have created one to preset the settings, or connect to
the Clients after installation to set them for either automatic discovery or manually select their time sources.
- Configure any third-party clients or devices on the network to get their time from the nearest Domain Time II Server.
- Use Manager to install the Monitor Service and
Update Server to automatically monitor your network and keep it updated.
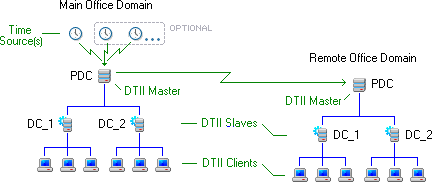
Multi-Domain Model
Networks with multiple Windows domains or Active Directory Forests with multiple trees.
The Single Domain Model described above should be implemented on each individual domain (tree), except that the Master
time server (the PDC-emulator) for each domain needs to be configured to get its time:
- from the Master Server on the primary domain, or
- from the same trusted time source(s) as the main domain's Master, or
- from its own local trusted time source(s), or
- Using a combination of the above methods (mesh configuration).
You can configure each domain's Master to get its own time in the various ways described below:
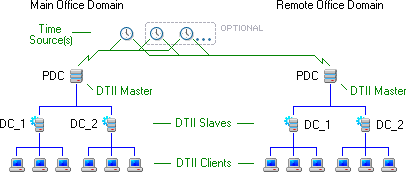
Option 1
In the first configuration option, the PDC for the master domain gets its time from its trusted source(s), while
the PDCs for each of the resource domains are manually configured to use the master domain's PDC as their external time source.
Multi-Domain Option 1 where secondary domain PDCs
get their time from the primary domain's PDC
The main advantages to this configuration are:
- The Master (PDC) running on each of the resource domains can automatically look up and use the Master of the main domain's PDC.
- The time hierarchy mirrors the Windows domain structure.
- Time in each domain will closely match the time in all other domains.
The main disadvantage to this configuration is:
- Using only the Master PDC of the main domain as a time source is a single point of failure for the resource domains.
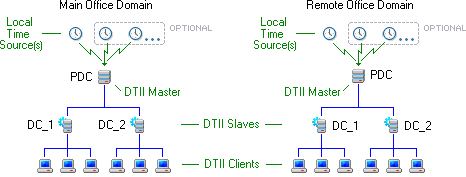
Option 2
In the second option, the Master (PDC) of each domain gets its time from the same trusted time source(s).
Multi-Domain Option 2 where each Master (PDC) gets its
own time from the same trusted time source(s)
The main advantage to this configuration is:
- Each domain has its own connection to the time source(s), If multiple sources are specified, there is no single point of failure.
The disadvantages to this configuration are:
- You must manually configure each Domain Time Server with the address of the time source(s).
- Each time check by each Server causes traffic to all time sources, which may be across WAN links.
- Time in each domain may differ slightly from each other (depending on which sources are local to the domain).
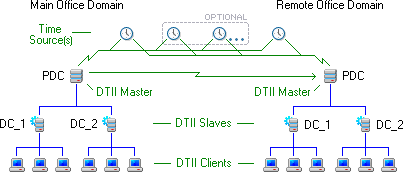
Option 3
The third option is similar to option 2, except the Master (PDC) of each domain gets its time from its own local trusted time sources.
Multi-Domain Option 3 where each Master (PDC) gets its
own time from local trusted time source(s)
The advantages to this configuration are:
- Each domain has its own connection to the time source(s), If multiple sources are specified, there is no single point of failure.
- Accuracy is improved since local time sources have lower latency than remote ones.
The disadvantages to this configuration are:
- You must manually configure each Domain Time Server with the address of the time source.
- Time in each domain may vary somewhat from other domains since the time is not compared between sites.
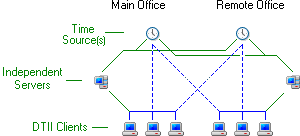
Option 4
The mesh configuration shown below represents an excellent configuration for using Domain Time across multiple domains or for an Active
Directory forest. Each PDC gets its time from both local and remote time sources, and also from other PDCs.
Multi-Domain Option 4 where each PDC gets its time from local and
remote time sources, plus the PDC in a mesh configuration.
There a number of advantages to a mesh configuration:
- Accuracy is improved across your entire enterprise since Variances among the various Servers and time sources are compensated for automatically.
- Stable local time sources are automatically preferred when server averaging ("Analyze all listed servers and choose the best...") is enabled..
- The network is more robust. Domain Time Masters adjust automatically to changes in the availability of any time sources.
If any source becomes unavailable, alternate sources are automatically used.
- The Master (PDC) running on each of domains can automatically look up and use the Master Server of any other domain.
The disadvantages to this configuration are:
- You must manually configure each Domain Time Server with the address of any non-Domain Time time source.
- Requires that each server be able to communicate with each other and each time source.
- Each time check by each Server causes traffic to all other Servers and time sources, which may be across WAN links.
Installation Plan:
(click the link to get detailed instructions for each component listed)
- Use Setup to install both Domain Time II Server
and the Management Tools on any machine you want to use as
your management workstation. Manager works best if you have trusts to all domains you want to manage.
If not, you should also install the Server and Management Tools on a machine in each of the untrusted domains and perform installations
to those domains from there. If you will be using Audit Server,
install it on this machine also. (Each instance of Server, Manager and Audit Server requires a separate license)
- You may use a single instance of Audit Server across multiple networks.
Alternately, you may want to install additional Audit Servers on individual networks to spread the Audit workload, if you want to use
different types of machines on multiple schedules, or to keep separate audit
data for individual domains/companies. Audit Server also has a special Standby Mode
for use in Disaster Recovery scenarios. (Each instance of Audit Server requires a separate license for Server, Manager, and Audit Server)
- Perform all of the tasks in theSingle Domain Model Installation Plan above on each domain (tree), starting with the top-level domain.
- Use Manager to configure the Master time servers (PDCs) of each domain to obtain time from available local trusted time source(s) and from each other.
Multiple Networks without Masters/Slaves
Installing Domain Time in multiple locations without using Masters or Slaves.
 When possible, you should install Domain Time using one of the Master/Slave configurations above. Masters and Slaves automatically provide important accuracy and
redundancy benefits. However, it is possible to construct a robust time hierarchy across multiple physical locations without using Master and Slaves, if necessary.
When possible, you should install Domain Time using one of the Master/Slave configurations above. Masters and Slaves automatically provide important accuracy and
redundancy benefits. However, it is possible to construct a robust time hierarchy across multiple physical locations without using Master and Slaves, if necessary.
Each physical location should be installed according to the instructions in the Workgroup Model above. Then, each Server should be
set to get time using server averaging ("Analyze all listed servers and choose the best..." is enabled)
from all available time sources. This creates a mesh configuration that harmonizes time among each of your locations, plus provides redundancy in case any time source becomes unavailable to the Servers.
Alternately, you can turn off server averaging and have your Domain Time Servers get their time using a fallback list of sources, where each Server would get
their time from their primary local time source, but would fall back to remote source(s) if the primary fails. Use this option if you have high or variable latency
network connections between your locations.
To provide redundancy to your Clients, you will need to make manual changes to the time sources list. First, configure the Clients in each location to use their
listed time sources as a fallback-list ("Analyze all listed servers and choose the best..." is disabled)
so that each Client first contacts its local Domain Time Server for the time. Then, list any other Domain Time Servers (local or remote) and/or other available time sources
(local sources first) so that Clients can fallback to those if no Domain Time Servers are reachable.
For example, Clients might have these servers listed in their Obtain the time time sources lists (Fallback-mode):
| Main Office |
|
Remote Office |
Source 1:
Main Office Domain Time Server
Source 2:
Main Office GPS Server
Source 3:
Remote Office Domain Time Server
Source 4:
Remote Office GPS Server
|
|
Source 1:
Remote Office Domain Time Server
Source 2:
Remote Office GPS Server
Source 3:
Main Office Domain Time Server
Source 4:
Main Office GPS Server
|
Installation Plan:
(click the link to get detailed instructions for each component listed)
- Use Setup to install both Domain Time II Server
and the Management Tools on any machine you want to use as
your management workstation. Manager works best if you have trusts to all domains you want to manage.
If not, you should also install the Management Tools on a machine in each of the untrusted domains and perform installations
to those domains from there. If you will be using Audit Server,
install it on this machine also. (Each instance of Server, Manager and Audit Server requires a separate license)
- You may use a single instance of Audit Server across multiple networks.
Alternately, you may want to install additional Audit Servers on individual networks to spread the Audit workload, if you want to use
different types of machines on multiple schedules, or to keep separate audit
data for individual domains/companies. Audit Server also has a special Standby Mode
for use in Disaster Recovery scenarios. (Each instance of Audit Server requires a separate license for Server, Manager, and Audit Server)
- Perform all of the tasks in the Workgroup Model Installation Plan above in each physical location.
- Use Manager to configure the Servers in each location to obtain time from available trusted time source(s) and from each other.
- Turn off Server Averaging on the Clients, and configure the Time Sources list so that the local Domain Time Server is listed first, then add Domain Time
Servers in other locations, and finally, all other time sources (local sources first).
PTP Using a Hardware Grandmaster Model
For synchronizing machines using PTP from a hardware Grandmaster.
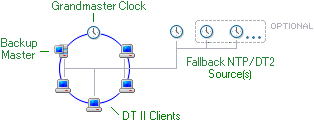
There must be a hardware Grandmaster clock available, preferably on the same subnet as the other PTP devices. The device
should provide IEEE 802.3 implementations of either the Default, Enterprise, or Telecom PTP profile.
Although the PTP protocols may be routed to other subnets, the additional latency and possible queuing or discard of UDP
packets by intervening routers may make this problematic. Boundary or Transparent clocks are preferred for distributing PTP to subnets.
For redundancy, we recommend there be at least one additional
machine (preferably another hardware clock) capable of becoming Grandmaster should the primary go offline.
Domain Time Server can also be configured to be a backup clock capable of assuming the Grandmaster role if you are using
the Default or Enterprise PTP profile.
All other Windows machines on the network should run Domain Time II Client.
IMPORTANT: All Domain Time II machines should have at least one NTP or DT2 Server set as a fallback time source.
Note: These settings can be pre-configured and rolled-out to multiple machines using Domain Time Manager.
Installation Plan:
(click the link to get detailed instructions for each component listed)
- If using Domain Time Server as a backup PTP master (Default or Enterprise profile), install Server on at least one machine.
- First, configure Server to become a PTP slave (see Configuring Domain Time II for PTP).
- Then, configure the Server to become a PTP master (see How to configure Domain Time Server as a PTP Master).
If using the Default or Enterprise profile, set this machine's Master priority so that it has lower precedence (a higher numeric value) than the Grandmaster's priority setting.
- Install Client on all other Windows machines. Configure
the Clients to become PTP slaves (see Configuring Domain Time II for PTP).
If you will be using Domain Time Manager/Audit Server:
- Use Setup to install both Domain Time II Server
and the Management Tools on any machine you want to use as
your management workstation. Configure Server to become a PTP slave (see Configuring Domain Time II for PTP).
You may also configure it to be a backup PTP master, as described above. If you will be using Audit Server,
install it on this machine also.
Manager works best if you have trusts to all domains you want to manage.
If not, you should also install the Management Tools on a machine in each of the untrusted domains and perform installations
to those domains from there. If you will be using Audit Server,
install it on this machine also. (Each instance of Server, Manager and Audit Server requires a separate license)
- You may use a single instance of Audit Server across multiple networks.
Alternately, you may want to install additional Audit Servers on individual networks to spread the Audit workload, if you want to use
different types of machines on multiple schedules, or to keep separate audit
data for individual domains/companies. Audit Server also has a special Standby Mode
for use in Disaster Recovery scenarios. (Each instance of Audit Server requires a separate license for Server, Manager, and Audit Server)
- Use Manager to perform each of the following steps from your management workstation:
- If you want to pre-configure your Client installation settings for network rollout:
- Install Client on a test machine to prepare an installation template .reg file for Manager to use.
- Connect to the Client's Control Panel applet to set up the Client exactly the way you want it to be configured.
- Use the Client's Import/Export utility to export the Client settings to a
.reg file. Copy the the .reg file to the Manager's Program Files\Domain Time II folder to be available as a template for installation.
- Install Client on all other Windows machines. Select the template .reg file if you have created one to preset the settings, or connect to
the Clients after installation to set them for either automatic discovery or manually select their time sources.
PTP Using a Software Grandmaster Model
For synchronizing machines using PTP from a Software Grandmaster.
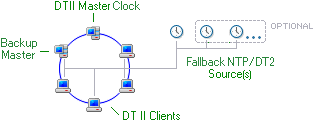
There must be a machine configured to be a software Grandmaster clock available, preferably on the same subnet as the other PTP devices.
The device should provide IEEE 802.3 implementations of either the Default, Enterprise, or Telecom PTP profile.
Although the PTP protocols may be routed to other subnets, the additional latency and possible queuing or discard of UDP
packets by intervening routers may make this problematic. Boundary or Transparent clocks are preferred for distributing
Default or Enterprise profile PTP to subnets.
For redundancy, we recommend there be at least one additional
machine capable of becoming Grandmaster should the primary go offline.
Domain Time Server can be configured to be a backup clock capable of assuming the Grandmaster role using the Default or Enterprise PTP profile.
All other Windows machines on the network should run Domain Time II Client.
IMPORTANT: All Domain Time II machines should have at least one NTP or DT2 Server set as a fallback time source.
Note: These settings can be pre-configured and rolled-out to multiple machines using Domain Time Manager.
Installation Plan:
(click the link to get detailed instructions for each component listed)
- To use Domain Time Server as the Grandmaster clock, install Server.
Configure this machine to get its own time from at least one NTP or DT2 time source.
If using the Default or Enterprise profile, set this machine's Master priority so that it has higher precedence (a lower numeric value) than any other PTP device on the network.
- If using Domain Time Server as a backup PTP master (Default or Enterprise profile), install Server on at least one machine.
- First, configure backup Server to become a PTP slave (see Configuring Domain Time II for PTP).
- Then, configure the Server to become a PTP master (see How to configure Domain Time Server as a PTP Master).
Set this machine's Master priority so that it has lower precedence (a higher numeric value) than the Grandmaster's priority setting (if using the Default or Enterprise profiles).
- Install Client on all other Windows machines. Configure
the Clients to become PTP slaves (see Configuring Domain Time II for PTP).
If you will be using Domain Time Manager/Audit Server:
- Use Setup to install both Domain Time II Server
and the Management Tools on any machine you want to use as
your management workstation. Configure Server to become a PTP slave (see Configuring Domain Time II for PTP).
You may also configure it to be a backup PTP master, as described above. If you will be using Audit Server,
install it on this machine also.
Manager works best if you have trusts to all domains you want to manage.
If not, you should also install the Management Tools on a machine in each of the untrusted domains and perform installations
to those domains from there. If you will be using Audit Server,
install it on this machine also. (Each instance of Server, Manager and Audit Server requires a separate license)
- You may use a single instance of Audit Server across multiple networks.
Alternately, you may want to install additional Audit Servers on individual networks to spread the Audit workload, if you want to use
different types of machines on multiple schedules, or to keep separate audit
data for individual domains/companies. Audit Server also has a special Standby Mode
for use in Disaster Recovery scenarios. (Each instance of Audit Server requires a separate license for Server, Manager, and Audit Server)
- Use Manager to perform each of the following steps from your management workstation:
- If you want to pre-configure your Client installation settings for network rollout:
- Install Client on a test machine to prepare an installation template .reg file for Manager to use.
- Connect to the Client's Control Panel applet to set up the Client exactly the way you want it to be configured.
- Use the Client's Import/Export utility to export the Client settings to a
.reg file. Copy the the .reg file to the Manager's Program Files\Domain Time II folder to be available as a template for installation.
- Install Client on all other Windows machines. Select the template .reg file if you have created one to preset the settings, or connect to
the Clients after installation to set them for either automatic discovery or manually select their time sources.


