Top of Page

Domain Time II
Version 5.2

Network Rollout


You can remotely install, upgrade, configure, or remove Domain Time II components to other machines on your network using Domain Time II Manager. There's no need to visit individual machines to install or configure them!
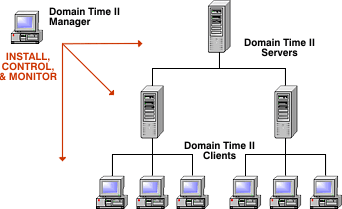
Rolling out Domain Time II

    You may also easily integrate Domain Time into your existing package distribution systems or cloned-install routines. Domain Time Server and Client have a built-in export utility to create standard Windows Registry files that allow you to preset your systems with all of your desired configuration options, while omitting any settings specific to individual machines.

    Follow these steps to rollout Domain Time to your entire network:

    1. Carefully review the System Requirements and Planning pages to be sure you understand the basic requirements for using this version of Domain Time.

    2. Decide on a Recommended Configuration and adapt it to your environment to create a detailed installation plan. You should follow your organization's standard quality-control procedures for testing and validation of new software (i.e. using separate test, staging, and production networks).

    3. Verify your environment meets the minimum requirements for performing remote operations using Domain Time components. In order to be able to install, upgrade, or configure remote machines:

      • Your network must be a correctly-configured Windows network, i.e. configured with working name resolution (DNS, WINS, NetBIOS, etc.), correct and functioning Active Directory (if used), working inter-domain trusts, etc.

      • Your network must pass both UDP and TCP network traffic sent to destination port 9909. Switches and firewalls must pass this traffic bi-directionally, since traffic will originate either from Manager or the remote machines. Your network must pass this traffic, regardless of what time protocols are used to actually synchronize the time.

      Note: As of Version 5.2.b.20150821, Domain Time supports automatic management of the Windows Firewall to allow access to the required time protocol and control ports. See Auto-Manage Windows Firewall Settings for detailed information.

      • The remote machine must respond to PING requests from the connecting machine.

      • The connecting Domain Time program, utility, or service must be run using credentials with sufficient privileges to connect to and write files to the administrative shares on the remote machine using Microsoft Networking (Domain Admin if the target is a domain member, Local Machine Administrator if the target is in a workgroup).

      • The Remote Registry Service must be running on the remote systems and its registry keys must be accessible to the connecting program.

      • All files from the original distribution for each type of product you want to install (Server, Client, etc.) must be extracted and present on your connecting machine. Setup copies these to the proper locations in the \Program Files\Domain Time II folder for you automatically when you install the Management Tools.

    4. Use the Setup program to install Manager (Management Tools) on the machine that you want to use as your Management Workstation.

      • Since many functions of Domain Time II Manager depend on accurate time calculations, it should always be run on a physical (not virtual) machine.

      • If you will be using Audit Server, you should install both Manager and Domain Time II Server on the same machine you intend to use for Audit Server.

    5. If desired, create template .reg files containing your desired pre-set Server and/or Client settings to use during installation or upgrades.

        Template .reg files are very handy for multiple-machine installations or ensuring that repeated single-machine installations will be identical. They are also ideal for use with software installation packaging tools (like creating .MSI packages) or creating cloned images.

        You do not have to create template files for simple rollouts or single-machine installations if you would prefer not to. Simply use Setup or Manager to install the Domain Time Server or Client with the default settings and change the configuration as needed afterwards.

        Here's how to create custom template .reg files:

        1. Use Manager to install Domain Time II Server and/or Domain Time II Client on machines you want to use as exemplar systems for creating your template(s). Exemplar machines should be comparable to systems you will actually use in production, if possible.

        2. Use Manager to connect remotely to the Domain Time Control Panel applet on each exemplar machine. Configure and test them with the exact settings you want your remotely-installed systems to use. Be sure to verify all of the settings carefully.

        3. Use the exemplar Server and/or Client's Save Settings to File utility (found on the Import/Export property page of the Control Panel applet) to save the template .reg file into the C:\Program Files\Domain Time II\Templates\[Server][Client]\ folder of the Domain Time II Manager machine. Template .reg files located in those folders will automatically be made available for use when installing or upgrading using Manager.

          Note: If you launch the Control Panel applet of your exemplar machine using Manager, the export will automatically offer to save the .reg file in the proper directory on the Manager machine. Otherwise, you will have to manually save or copy the file to the Manager machine.

          The .reg files containing the manufacturer's default settings for Server and Client are located in the installation folders (i.e. \i386 or \amd64) for each component (DTSERVER.REG for Server, DTCLIENT.REG for Client). You should not change these under most circumstances (create new custom template .reg files instead), however, if you must change the overall defaults, be sure to make a backup copy so you can revert if necessary.


        IMPORTANT: Although .reg files created using this utility are saved in standard Windows registry file format, it is not equivalent to exporting the registry keys using Windows' RegEdit program. A number of registry settings on a running Domain Time system are machine-specific, and are likely to cause problems if directly copied into another machine's registry. Those settings are automatically excluded when you export using this utility, so you should always use this utility to create a Domain Time .reg file.

    6. If you will be using Active Directory policies and/or DHCP Server Options to globally set Domain Time settings on your network, configure them on your domains, then test the results of those settings on your exemplar machines and a representative sample of other systems on remote subnets before rolling out Domain Time on a broad scale.

    7. Use Manager to complete the detailed Installation Plan for your network, rolling out first to Domain Controllers, other Servers, and then Clients. See Manager's instructions pages on how to perform batch installation or upgrades on all of the various machines on your network.


Next Proceed to the Active Directory Policies page
Back Back to the Command-line Options page

Domain Time II Software distributed by Microsemi, Inc.
Documentation copyright © 1995-2024 Greyware Automation Products, Inc.
All Rights Reserved
All Trademarks mentioned are the properties of their respective owners.