 Domain Time II Update Server
Version 4.1 Domain Time II Update Server is a Windows system service that runs unattended on a machine to automatically install or update Domain Time II components as machines come online in the selected domain(s). Update Server ensures that all domain systems always have the current version of Domain Time II software installed. Even laptops that are only occasionally connected to the network can have Domain Time II installed/upgraded when they do connect. It also makes upgrading systems to new versions of the software completely automatic - as soon as the Management Tools on the Update Server machine are upgraded, Update Server can roll out the new versions of Server and Client to the network automatically. No further intervention by the administrator is required!
Requirements
Installing the service Update Server is installed from the Advanced Settings tab page of Domain Time II Manager. Click on the Install button to begin the installation.
The Update Server must run in a security context with appropriate domain administrative permissions both to run as a service and to perform
installations on the remote machines. When the Update Server setup program prompts you, enter the account you wish to use in the form
DOMAIN\AdminAccount. For example, the administrative account in the OURDOMAIN domain would be entered as
OURDOMAIN\Administrator.
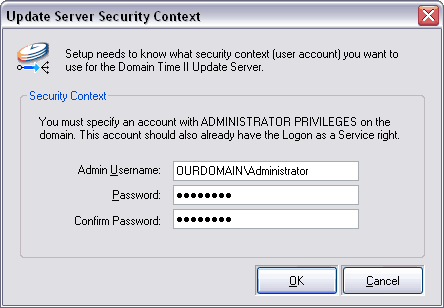 The Update Server Control Panel Applet - Security Context Setup Note that this account needs to have the Run as a Service Right. See Manually Adding System Service Rights for more information. Update Server Control Panel Applet Once the Update Server service has been installed, you may configure the service using its Control Panel applet. You can start the applet from the Advanced Settings and Tools tab page of Domain Time II Manager or directly from the Control Panel.
Note: On Vista with UAC enabled, you must Shift+Right Click and choose Run As... from the context menu to launch the Control Panel applet. On Windows Server Core, type in dtupdate.cpl on the command line.
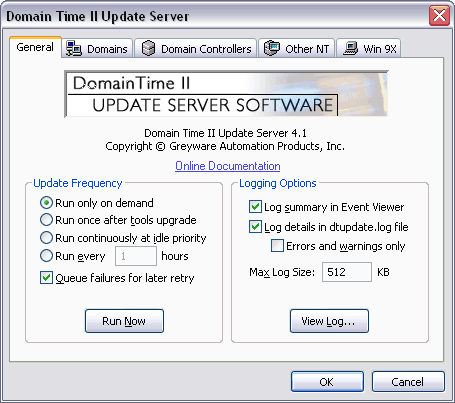
Use this tab page to set how often Update Server runs and how it logs its activities.
 The Update Server Control Panel Applet - General tab
Update Server can be configured to operate manually or automatically.
When this button is selected, Update Server will only perform updates and installations when you click on the Run Now button.
Run once after tools upgrade
Run continuously at idle priority
Run every hours
Queue failures for later retry
Logging Options
Check this box if you want Update Server to log summary information to the Windows Application Event logs.
Log details in dtupdate.log file Errors and warnings only On a large network, your log can grow quite rapidly. You may reduce the level of detail to include only errors and warnings if you find the normal logging level burdensome. Max Log Size: KB You can limit the size of the DTUPDATE.LOG file to avoid overflowing your disk. Set this value to 0 if you want the log to grow without limits. Click the View Log button to pull up the Log Viewer. This window allows you to see the log running in real-time, lets you save the log to another file, and lets you clear the log. Domains Use this tab to select the domains Update Manager will access when doing installs and updates.
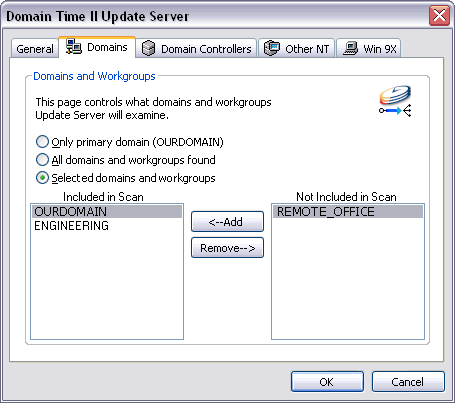 The Update Server Control Panel Applet - Domains tab page
Specify which domains and workgroups are to be examined by Update Server.
When this button is selected, Update Server will examine only the domain of which the Update Manager machine is a member. If there is only one domain visible, the radio buttons for other domain choices will be greyed out and the domain selection boxes will not be visible.
All domains found
Selected domains Domain Controllers This tab page allows you to specify the actions you want Update Server to take when it finds a Domain Controller or a RAS machine during its scan of the network.
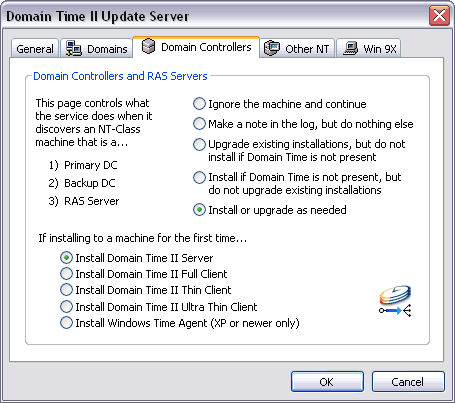 The Update Server Control Panel Applet - Domain Controllers tab page Select the action you want Update Server to perform for Domain Controllers and RAS machines:
Instructs Update Manager to take no action of any kind.
Make a note in the log, but do nothing else
Upgrade existing installations, but do not install if Domain Time is not present
Install if Domain Time is not present, but do not upgrade existing installations
Install or upgrade as needed Select the Domain Time component you want Update Server to install on Domain Controllers and RAS systems:
Install Domain Time II Full Client Install Domain Time II Thin Client Install Domain Time II Ultra Thin Client Install Windows Time Agent (XP or newer only) - Keep in mind Windows Time Agent is automatically installed with any Windows Server or Client. Choose this item only if you want the stand-alone version of Windows Time Agent to be installed. Other NT This tab page allows you to specify the actions you want Update Server to take when it finds a machine running Windows (either as a member server, workstation, or stand-alone system) during its scan of the network.
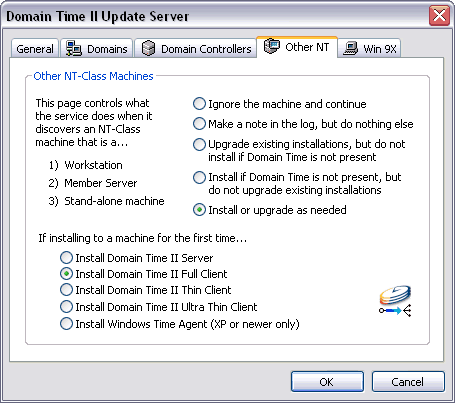 The Update Server Control Panel Applet - Other NT tab page Select the action you want Update Server to perform on Windows systems:
Instructs Update Manager to take no action of any kind.
Make a note in the log, but do nothing else
Upgrade existing installations, but do not install if Domain Time is not present
Install if Domain Time is not present, but do not upgrade existing installations
Install or upgrade as needed Select the Domain Time component you want Update Server to install on Windows systems (Either Client is recommended):
Install Domain Time II Full Client Install Domain Time II Thin Client Install Domain Time II Ultra Thin Client Install Windows Time Agent (XP or newer only) - Keep in mind Windows Time Agent is automatically installed with any Windows Server or Client. Choose this item only if you want the stand-alone version of Windows Time Agent to be installed. Win 9X This tab page allows you to specify the actions you want Update Server to take when it finds a machine running Win95/98 or ME during its scan of the network.
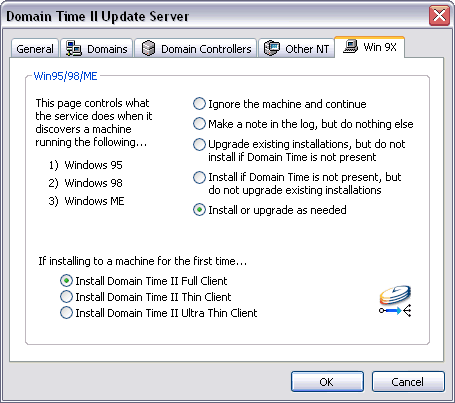 The Update Server Control Panel Applet - Win 9X tab page Select the action you want Update Server to perform on Win 9X systems:
Instructs Update Manager to take no action of any kind.
Make a note in the log, but do nothing else
Upgrade existing installations, but do not install if Domain Time is not present
Install if Domain Time is not present, but do not upgrade existing installations
Install or upgrade as needed Select the Domain Time component you want Update Server to install on Win 9X systems:
Install Domain Time II Thin Client Install Domain Time II Ultra Thin Client
|


