Documentation\Installation\Setup & Rollout Tools
|

Domain Time II has excellent tools for getting Domain Time II installed quickly and easily. The instructions below are for Windows systems. They
describe using the Setup program to install or remove Domain Time II components from the initial distribution files. The Domain Time II programs
for non-Windows platforms do not use the Setup program and have their own installation instructions which are detailed here.
What to install where
Most Domain Time II components can be installed using the Setup program detailed below. If you've purchased a Domain Time II package that
contains multiple components such as Domain Time II Complete or a Starter Kit, the recommended procedure to install Domain Time enterprise-wide is detailed in the
Rolling out Domain Time II to the Network section below.
Several Domain Time II components for Windows (Server, Clients, Management Tools, Windows Time Agent, etc.) can be obtained ala carte, in which case they
each come with their own installation package.
If you need to install a component separately, click a link below to jump directly to its own installation instructions page:
The Setup Program
The Domain Time II Setup program can be used to install, upgrade, or remove Domain Time II components on
Windows.
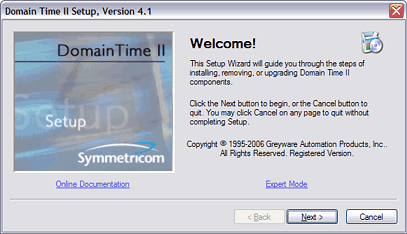
 The Domain Time II Setup Program - Welcome! Screen
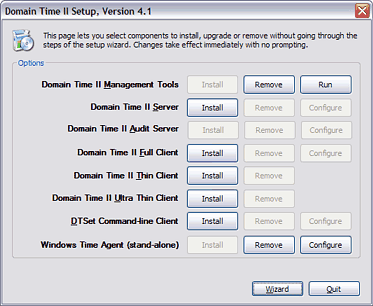
 The Domain Time II Setup Program - Expert Mode
|
To start Setup, click on the SETUP.EXE program in root folder of the distribution files.
Windows components of Domain Time II version 4.1 and higher come in either 32-bit or 64-bit versions. The 32-bit files are found in the /i386
folder of the distribution; the 64-bit version are in the /amd64 folder. The Setup program located in the root folder of the distribution will detect and install
the correct version for the machine on which you are installing.
There are also setup programs located in both the /i386 and /AMD64 folders.
Running those setup programs will install only their own version (i.e. the /AMD64/SETUP.EXE program will only run on 64-bit systems). Although the 32-bit
version of Domain Time can run on 64-bit systems, you should always install the 64-bit version on 64-bit systems.
When you start the Setup program, you have the option of using the Setup Wizard or Expert Mode. To use the Wizard, simply click
on the Next button, and the program will ask you a series of questions about which components
you wish to install (or upgrade/remove if appropriate).
To use Expert Mode, click the Expert Mode link on the Welcome! screen. Expert mode is a very quick and easy way to
install/upgrade/remove if you know exactly which component(s) you need. You may return to the Wizard by clicking the
Wizard button on the Expert mode screen.
Upgrading Components
Setup will also assist you in upgrading Domain Time II from previous versions. If you're running an earlier version of Domain Time, the
setup program will offer to upgrade it for you.
Removing Components
Domain Time II components can be removed using the Setup program as well. Just
select the item you wish to remove, and if Setup finds that the software is installed you'll
get the option to remove it. You can also use Domain Time II Manager to remove components from other machines on the network.
If you want to remove the Management Tools themselves, you will need to run a copy of Setup that does not live in the
C:\Program Files\Domain Time II directory. Extract the original distribution files to a blank folder (or load the
original Domain Time II CD) and run Setup from there.
Notes:
- Most Domain Time II components can be installed or removed from the command-line as well.
See the Command-line Setup Options page for details.
- If you use cloned OS images to install machines, please read this article from our knowledgebase
about configuring Domain Time II properly on your clone image.
- IMPORTANT: If you will be installing Domain Time II onto machines with AMD processors, we highly recommend you update your
processor drivers (a.k.a. PowerNow!) to the current version for your operating system available from AMD's website to avoid known hardware timing issues.
Please see this article from our knowledgebase for more info: KB2007.817.
Rolling out Domain Time II to the Network
Follow these recommendations to easily distribute Domain Time to your entire network.
 Set Up a Management Workstation
If you have purchased Domain Time II with Management Tools, your first step should be to use Setup to install or upgrade the Management Tools
on a Windows system that you wish to use as your Domain Time II management workstation.
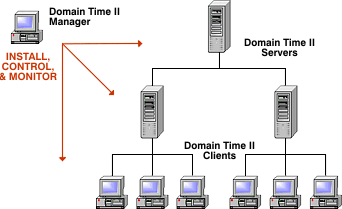
You can remotely install, upgrade, configure, or remove Domain Time II components to other machines on your network from
the management workstation (see requirements below). No need to visit individual machines to install or configure them!
Requirements for Remote Installation/Upgrades
In order to be able to install or upgrade a remote machine you must:
- Be able to ping the remote machine over the network from your Management Workstation.
- Be able to pass UDP traffic over port 9909 between the machines.
- Have sufficient account privileges to connect to and write files to the administrative shares on the remote machine using Microsoft Networking
- Have Remote Registry Service installed (on Win9x/ME) with admin rights to make addition/changes.
- Have the full installation files for each type of product you wish to install on your management
workstation - i.e. Server, Windows Clients, etc. (Setup copies these to the C:\Program Files\Domain Time II folder on
your workstation for you automatically when you install the Management Tools).
IMPORTANT NOTE: If you have a mixture of x86 (32-bit) Windows and x64 (64-bit) Windows you can use any version
of Manager to stop and start services, change configuration settings, or run variance reports, network probes, and license scans. However,
remote install, upgrade, or removal requires that the machine running Manager be the same platform as the target machine.
You cannot use a 32-bit version of Manager to install to 64-bit machines, or vice versa.
Setup Template File (domtime.ini)
The Domain Time II default configuration file
Although the default configurations of Domain Time II components are usually correct for most
situations (and adjustments to customize your settings can easily be made using the
component's Control Panel applet or using Domain Time II Manager), specific software settings required
for your installation can also be preset before setup using the
domtime.ini setup template file.
The domtime.ini file is found in the same folder as the Setup program and is copied to the
Domain Time II program folder when Management Tools are installed (usually C:\Program Files\Domain Time II).
This file is used by the Remote Installation functions of Domain Time II (such as when
using the Domain Time II Manager or
Update Server program to do batch installations on multiple machines).
The file is heavily commented, with all entries described so it is very easy to understand the settings. Here's a
sample file
Although the file is very handy for multiple installations or ensuring that repeated installations will be identical,
you do not have to edit or use it for single-machine installations if you would prefer not to. Simply use Setup to
install the software, and change the configuration as needed afterwards using the Control Panel or Manager.
Performing Remote Installations/Upgrades
There are two components of the Management Tools that are capable of installing/upgrading remotely: Domain Time II Manager, and
Update Server.
* Be sure you've entered the broadcast addresses for all the network segments you want to scan into Manager's
Broadcast Addresses list.
 Proceed to the Command-line Setup Options page Proceed to the Command-line Setup Options page
 Back to the Upgrading to Domain Time II page Back to the Upgrading to Domain Time II page
|


 Set Up a Management Workstation