Time Sources Tab Security Settings Tab Log Settings Tab Client Timings Tab Advanced Settings Tab

 Top of Page

 Documentation\Configuration\Clients\Windows\Full Client\Time Sources
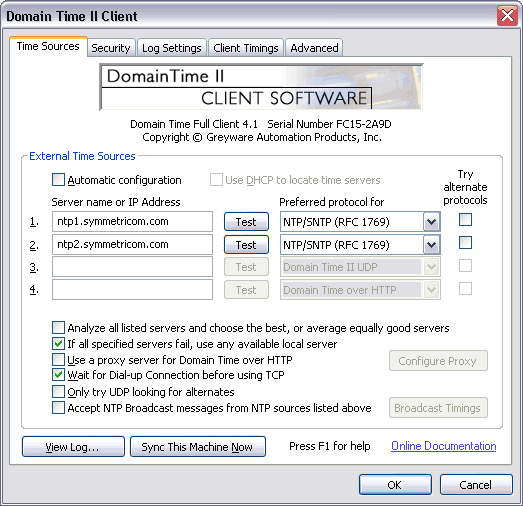
    The Time Sources tab page is where you specify where the Domain Time II Full Client is to connect over a network to obtain the time.

    Domain Time II Full Client Control Panel - Time Sources Tab
    Full Client Control Panel Applet - Time Sources Tab

    External Time Sources


    Use this section to control how this client obtains its time.

    Automatic Configuration
    When checked, Domain Time II Full Client will attempt to discover a time server automatically. Most of the options on this page will be greyed out.

      When using Automatic Configuration, Domain Time II Full Client will attempt to locate a Domain Time Server and appropriate time protocol automatically. In order for the client to succeed at this effort, you must have at least one Domain Time Server on the same network subnet, or have a properly configured DHCP server providing time server options on the same subnet.

      If the client is connecting via Dial-Up Networking, then you must have Domain Time II Server installed on the RAS Server for the client to automatically discover the server and synchronize its time.

      See Discovery Process for details on how clients locate servers.

      In the event where no Domain Time Server or DHCP server is on the same subnet, or you want to specify the time source and protocol for some other reason, you must use manual configuration (see below).

      Use DHCP to locate time servers
      Check this box if you wish client to request a time server address from a DHCP server.

        Domain Time II Full Client can get the address of a time server automatically from a properly configured DHCP server on the same subnet. The time server specified by the DHCP server does not have to be on the same subnet as the client, so this allows you a way automatically assign time servers to the client that would not be reachable using Automatic Configuration otherwise.

        See using DHCP to Specify Time Servers page for details on configuring DHCP to automatically specify available time servers.

    Manual Configuration
    When the Automation Configuration checkbox is unchecked, the client will use the settings specified on this page to locate time servers and the required protocols.

      Server name or IP address
      Fill in up to four server names or IP addresses, and select the appropriate protocol from the drop-down box beside each server's name.

      Source Boxes

      The client tries the listed servers in order, until it finds one that works and it uses that as the time source (unless you have the Analyze all listed servers... box checked - see below). List servers in your desired order of preference.

      If you are unsure what protocols are supported on your time source, you may fill in the server name and then press the Test button. The Control Panel applet will test the server for compliance with all known protocols and show you the results. Note: The time is not set during the test.
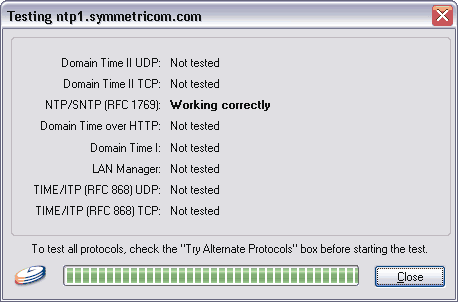
      Protocol Test

      Setting the Preferred Protocol
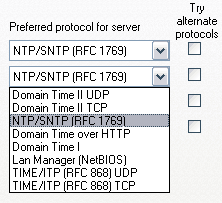
      Preferred Protocols box The protocol you select from the drop-down box is the preferred protocol for that server. Select the time protocol provided by the time source.
      If your time source provides multiple time protocols (such as another Domain Time II Full Client), you can choose which protocol you want Domain Time to use.

      You may also check the Try Alternate Protocols box if the server supports more than one time protocol, and you want the client to try them all in case the preferred protocol fails for some reason. If you do not check this box, then the client will only try the preferred protocol for that server (recommended). These boxes are greyed out when the Analyze all listed servers... box is checked.

        The protocols are checked in this order:
        1. Domain Time II UDP
        2. Domain Time II TCP
        3. NTP
        4. Domain Time I
        5. LAN Manager
        6. TIME/ITP UDP
        7. TIME/ITP TCP
        8. Domain Time II over HTTP

      Note: If you have the Try Alternate Protocols box checked, but your server only supplies one time protocol, this will result in delays and errors in the log each time the Domain Time synchronizes. For example, if you are using the Domain Time II protocol over HTTP through a firewall, you could receive up to six timeouts and warnings in the log each time the client synchronizes! Leave this box unchecked unless you are trying to troubleshoot a connection.

      Analyze all listed servers and choose the best...
      Instructs the client to use averaging calculations among the servers to determine the time.

        When checked, the client will request the time from each listed server and apply sophisticated analysis techniques to compare the results and decide upon the likely "correct time." At least two time sources must be specified and operating for this option to provide any benefits.

        If this option is unchecked, or only one server is available, then Domain Time II will accept only the first server as having the "correct time."

      If all specified servers fail, use any available local server
      Controls how the client handles fallback when each of the listed servers are unavailable.

        When this box is checked and none of the servers specified manually are available, the client will use the same discovery process used in the Automatic Configuration mode to attempt to locate a time server. It will synchronize to the first server it finds.

        See the Discovery Process page for details on the automatic server discovery process.

      Use a proxy server for Domain Time II over HTTP
      Allows you to obtain time from a Domain Time II Full Client through a web proxy.

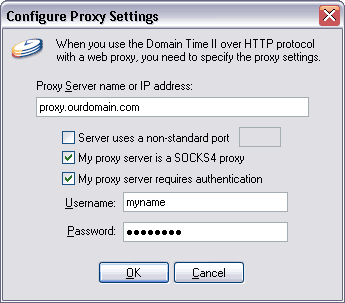
        Leave this box unchecked if you have direct TCP/IP access to your time source(s) using the standard time protocols. However, if you must access the time source through a proxy server because of firewall restrictions, you will need to check this box and fill in the name or IP address of the HTTP proxy server you wish to use.

        Proxy settings Server uses a non-standard port
        The Domain Time II over HTTP protocol uses the standard web port 80 by default. If you need to use a non-standard port, check the box, and fill in the correct port number.

        My proxy is a SOCKS4 proxy
        Domain Time supports SOCKS4 as well as regular web proxies. If your connection to the Internet is through a SOCKS4 gateway/firewall, then check this box.

        My proxy requires authentication
        Domain Time supports most proxy authentication schemes. If your proxy server requires authentication, you should check this box, and provide the correct username and password to access the proxy.

        Note that Microsoft Proxy Server can be configured to provide several different methods of access, including Winsock and/or SOCKS4 proxies. Some of these methods are simpler to use than others. In general you need to configure Domain Time to access the proxy in the same manner as your would do to browse with a web browser. In some cases (such as with certain implementations of the MS Winsock proxy), it may be necessary for you to connect to the proxy as an authorized logged-in user from the command-prompt before Domain Time II can connect.

        If you don't know whether or not you need to specify a proxy server, or if you have an authentication issue, ask your firewall system administrator for assistance.

      Wait for Dial-Up Connections before using TCP protocols
      When checked, the client will not communicate using the network until a Windows Dial-Up Networking connection is detected.

        This is a useful setting on remote machines that only connect to your network by dialing in. It also prevents the client from triggering an automatic dial-up attempt if the client machine is set for on-demand dialing. The client will only attempt to synchronize when the client reconnects to the network (usually within about five seconds).

        You should leave this box unchecked if your client machine is usually connected to the network so that the client can keep the time synchronized on an ongoing basis automatically.

      Only try UDP Protocols when checking for alternate protocols
      When this box is checked, the client will only use UDP protocols when attempting to find if another protocol is enabled on the server.

        Use this setting only if you are not using Domain Time II UDP protocol on your server and wish the client to auto-discover other protocols that may be in use. In most cases, the Domain Time II UDP protocol will be enabled, so this box should not be checked.

      Accept NTP Broadcast messages from NTP sources listed above
      When this box is checked, the client will accept NTP Broadcasts from any NTP servers listed in the Sources list. Set this option with caution. See the When to use Heartbeats and NTP Broadcasts page for a full explanation of when to use NTP Broadcasts.

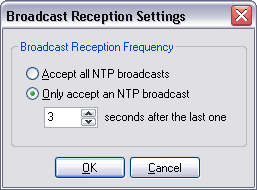
        Click the Broadcast Timings button to configure how Full Client will respond to NTP Broadcasts.

        Broadcast Reception Frequency


        Broadcast Reception Settings Accept all NTP broadcasts
        Full Client will accept all NTP broadcasts it receives, no matter how rapidly they arrive.

        Only accept an NTP broadcast
                seconds after the last one

        Limits the acceptable NTP broadcasts to a reasonable range. Setting this value can help the client ignore spurious broadcasts, or to control broadcasts from a server that has its broadcast rate set too high.

    Additional Items


    • View Log
      You may view the current Domain Time II Client log file (kept in the %systemroot%\system32\domtimec.log file) on your local machine by clicking this button. See the Log Settings tab page for more information about the logs.

    • Sync This Machine Now
      Clicking this button will cause the local machine to attempt to synchronize its time with whatever system it has been configured to use as its time source.

    • System Tray Applet
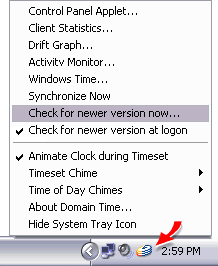
      dttray/ The Server can display the DTTray System Tray Applet in the Start Bar system tray. The System Tray icon provides visual and audible (if desired) confirmation that the system is correctly synchronized. It also allows a user the ability to trigger a time sync, launch other Domain Time II applications, turn the chimes features on or off, view the Activity Monitor, the client and server time statistics and drift graphs, etc.

      Hint: Right-click the system tray icon to see the context menu.

      You can also use the System Tray applet to check for and download new versions of the software (if your support contract is current). The logged-in user must have access to the Internet and also have rights to install software in order to check for new versions.

      If you do not want the system tray applet to appear, it can be disabled from the System Tray menu. This feature can also be disabled by default during installation by changing the INI Defaults file.

      Read more about the full capabilities of the System Tray Applet.


    Next Proceed to the Security Settings page
    Back Back to the Installation Instructions page

Domain Time II Software distributed by Microsemi, Inc.
Documentation copyright © 1995-2024 Greyware Automation Products, Inc.
All Rights Reserved
All Trademarks mentioned are the properties of their respective owners.