Browse Tab  Variance Reports Tab Network Scan Tab License Report Tab Batch Operations Tab Advanced Settings Tab About Tab

 Top of Page

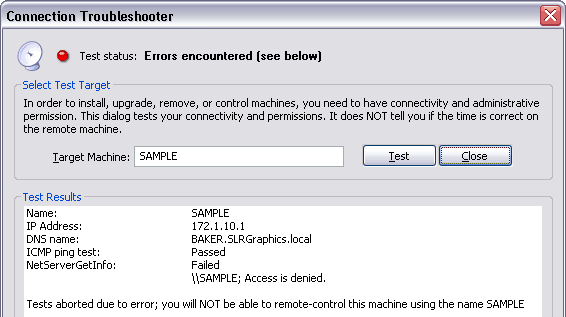
 Documentation\Configuration\Tools\Manager\Browse
    The Browse tab page displays all of the machines that Manager can see on your network, and the type of Domain Time software that it discovers.

    The first section of this documentation page describes the basic functions of the Browse tab, the second part of the page describes how to use Domain Time II Manager to control and install software on remote machines.
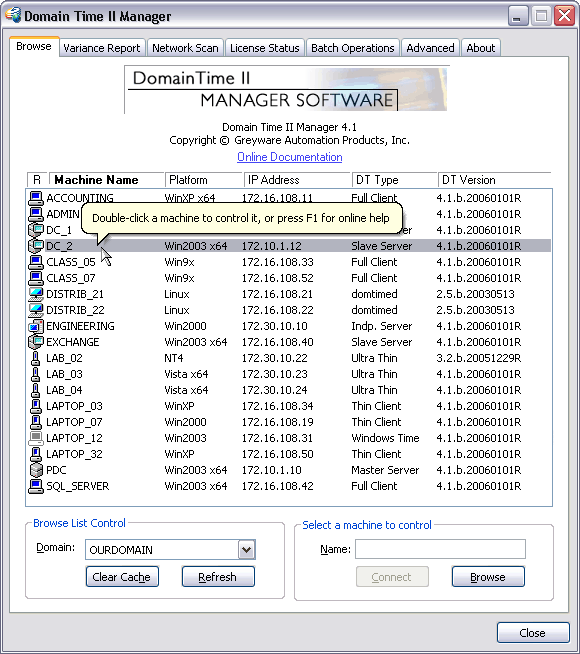
    Domain Time II Manager - Browse tab
    Domain Time II Manager - Browse tab

    Many of the features of Domain Time II Manager have Tooltips associated with them to explain what they are and how to use them. Let your mouse hover over various items on Manager's lists, checkboxes, control buttons, and icons to learn more about each of them. You can also press F1 at any time in the application to pull up the full online documentation for any tab page you're viewing.

    Network Auto-Discovery


    When you first start Domain Time II Manager, the program will attempt to discover all of the machines on your network and their Domain Time configuration. If you've not yet installed any Domain Time components, the Domain Time columns of the display will be empty. Machines where the status cannot be determined will be greyed-out.

      Manager uses several different methods to automatically discover machines, however, the specific configuration of your network and your Windows Networking domains (DNS, WINS, etc.) will control how much of the network is actually visible. Manager primarily uses the Windows Browse list, so a good rule of thumb is that if a machine is visible on the local subnet using standard Microsoft networking tools such as Network Neighborhood (My Network Places) or NET VIEW from the management workstation, they should be visible in the Browse list here.

    Viewing Other Subnets and Timeouts
    Machines responding to UDP port 9909 broadcasts or LANMan browse requests in a timely fashion will be visible to Domain Time II Manager.

      By default you can only see machines on your own local network. However, you can add additional IP subnets to your scans. You do this by adding broadcast subnet masks for the additional subnets you want to view to your Domain Time II Manager Broadcast Addresses settings (see the Advanced Settings tab page).

      Also, the speed of your network connections can affect whether a machine is visible. Domain Time II Manager has several timeout options that allow you to increase the time it waits before deciding a machine is unreachable to deal with slow WAN or dial-up links. This is controlled by the Connection Timeouts drop-down list setting on the Advanced Settings tab page. If the Browse list takes a long time to display, try changing the Timeout setting to Fast Lan.

      Both of these are overall network settings affecting all Domain Time II Manager functions. A complete description of these options is found on the Advanced Settings documentation page.

    Browse List Control


    Controls which Domains are listed on the Browse page, and also lets you clear or refresh the Browse list cache.

      Domain: You can select which Windows Networking domain list to display using this drop-down selection box.

        The domains listed will be those that are visible from the machine running Manager. In order to control machines on any domain, your logged-in account will need to have administrator rights on the domain (via standard domain trusts or Active Directory policies if necessary). Once again, the machines listed are only those visible to your machine - specific networking infrastructure (firewalls, routers, VLANS, etc.) and/or non-standard Windows Networking configurations such as disabled browse lists, can prevent machines from being displayed.

      Clear Cache and Refresh
      Clear the Browse List and completely re-scan the network, or update the existing Browse list.

        Domain Time II Manager maintains a local cache of all machines it finds to speed up the Browse display upon subsequent viewings. Rather than performing the time-intensive steps of first discovering the existence of each machine and then scanning it for its Domain Time status, if a machine is already in the Browse list its status can be very quickly determined and displayed using the cache. Domain Time II Manager also automatically adds to the cache as it discovers more information about machines (such as when performing Variance Reports or License Scans).

        Click the Refresh button to have Manager re-check the network to update its cache with updated Domain Time status and also include any new machines that may have been added to the network since the last scan.

        Clicking the Clear Cache button will completely remove all previously cached information, and trigger Manager to start a network scan from scratch.

    Select a machine to control


    Connect to an existing machine from the Browse list (or add an unlisted machine) to view its statistics and/or remotely control, install, update, or remove Domain Time.

      To connect to a machine, double-click on its name in the displayed list (you can also do this on machines listed on the other tab pages in Domain Time II Manager). You may also use the Browse button to select a machine from the My Network Places (Network Neighborhood) lists, or you may simply enter its name or IP address in the Name: box and click the Connect button to cause Manager to attempt to connect to it. This is handy if you know that a particular machine exists, but it is not visible in any of the Browse lists.


     Using Manager to Control Remote Machines

    Making the First Connection/The Connection Troubleshooter


    To make a remote connection, double-click a machine name from the list of displayed machines or use the Select a machine to control section to specify one and click Connect. After a few seconds, the "Connected to" screen will appear. If Domain Time is not yet installed on the remote machine, the "Connected to" screen will indicate No DT2 components found in the upper section of the window. You may also see a connection error in the status window - this is normal, since there isn't any service running on the remote machine to talk to yet).
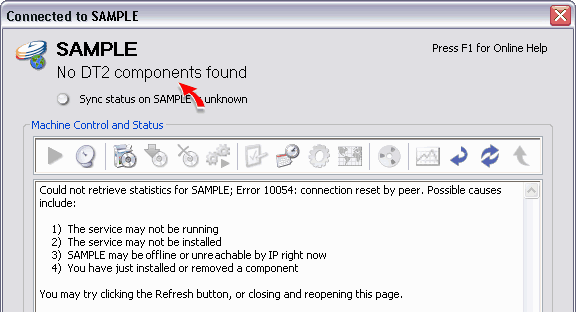
    Connected To Screen - First Install

      Note in particular the Machine Control and Status toolbar. This is where you'll select which actions you want to perform on your remote machine. Use your mouse to hover over each of the icons to see a description of each icon's function.

      The Machine Control and Status Toolbar

      Requirements for Remote Control/Installation:
      These are the minimum requirements necessary to remotely control or install/upgrade/remove software on another machine using Domain Time II Manager. For a more complete description of the requirements to connect to a machine remotely, please see our knowledgebase article KB2001.728.

      1. Only machines running version 2.2 or higher of Domain Time II Server, Thin/Ultra Thin/Full Client, Audit Server or Windows Time Applet (v4.1 or later) can be remotely installed or controlled from Domain Time II Manager.
      2. The remote machine must be reachable by ICMP PING from your Management Workstation.
      3. All firewalls, routers, and switches must permit IP communication over UDP Port 9909 between the management machine and any remote machines.
      4. The user account you are logged in with on the Management machine must have sufficient account privileges to read/write/change files though the admin shares (ADMIN$, C$, etc.) on the remote machine using Microsoft Networking (on Win9x machines, File & Print Services must be manually enabled for this).
      5. Your user account must have sufficient account privileges to read/write/change the registry on the remote machine using the Remote Registry service. (on Win9x machines, the Remote Registry service must be installed manually. See Microsoft Knowledgebase article Q141460 for instructions).
      6. Have the full installation files for each type of product you want to install on your management workstation - i.e. Server, Full Client and/or Thin Client (Setup copies these to your workstation for you automatically when you install the management tools).

      IMPORTANT:


      The Domain Time II Management Tools software for Windows comes in two distinct versions: one made specifically for 32-bit (i386) processors and the other for 64-bit (AMD64/EM64T) processors.

      Domain Time II Manager can remotely control and monitor machines already running either the 32-bit or 64-bit versions of Domain Time II Server, Client or Audit Server; HOWEVER, it can only install, upgrade or remove components from machines running on the same platform as the Domain Time II Manager machine. In other words, if the 64-bit version of Domain Time II Manager is installed, it can only install software to other 64-bit machines. Conversely, if the 32-bit version of Domain Time II Manager is installed, it can only install to other 32-bit machines.

      The above restriction also applies to the Domain Time II Update Service.


      Running the Connection Troubleshooter
      Connected To Screen - Connection Troubleshooter It's a very good idea to run the Troubleshooter the first time you use Manager to make sure you've met all the requirements for remote management.

        You can also run the Troubleshooter if you ever have trouble controlling or installing to a remote machine from Manager (i.e., you connect but receive a "Control Access Denied" or other error message).

        The Connection Troubleshooter will test the various methods necessary to successfully connect to the remote system. If your local and remote systems meet all of the requirements, you'll see a successful test result:
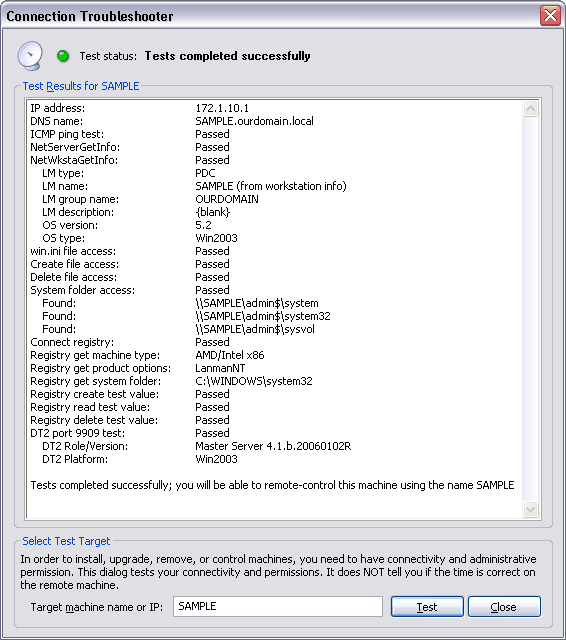
      The results of a successful test with the Connection Troubleshooter

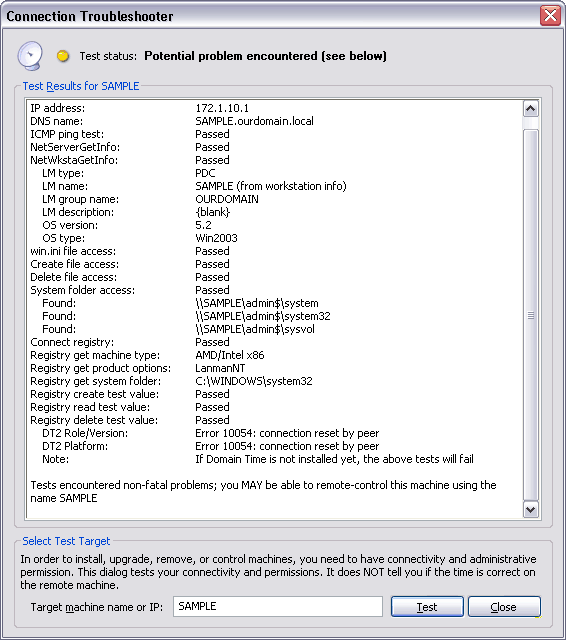
        Note: If no Domain Time II components are installed yet, the test will generate a warning for the DT2 connection tests (DT2 port, Role/Version, Platform). You can safely ignore those errors until you've installed Domain Time on the machine. If the Troubleshooter still shows a warning after you've installed Domain Time II Server, Client, or Windows Time Agent, then there is a network problem preventing Manager from exchanging Domain Time II control messages with the remote machine (probably because a firewall or router is blocking UDP port 9909).

        If there are problems with the connection, the troubleshooter will halt at the first test that failed (except for the final DT2 connection tests, which will only generate a warning). You should take steps to correct the error indicated, then run the Troubleshooter again. Keep re-running the Troubleshooter after fixing any additional problems until your test completes with no errors.

        Here are some samples of common errors:

        • Test 1: A failed test indicating the remote machine is probably turned off, not connected to the network, network communication is being entirely blocked by a firewall/router, etc.

          Test results from a completely unreachable machine

            Solution: Troubleshoot the network connection.

        • Test 2: This test failed because the logged-in user account on the machine running Manager did not have sufficient rights to connect to the remote machine.

          Test results from a user with insufficient rights to connect to the remote machine

            Solution: Log in to the Manager machine using a user account with Admin privileges to the remote machine.

        • Test 3: This test generated a warning because Manager was unable to exchange Domain Time II control messages with the remote machine using the Domain Time II protocol. This is normal if Domain Time is not yet installed on the remote machine. However, if the error occurs after you've installed Domain Time II Server, Client, or Windows Time Agent, then there is a network problem that should be resolved.

            Manager may still be able to remotely install software and perform some control functions on the remote machine in this error condition, however, other functions (such as retreiving statistics) that depend on the DT2 protocol will fail.

          Results of a test with a warning regarding problems with UDP port 9909 traffic

            Solution: Troubleshoot the network connection for obstructions to port 9909 UDP traffic. (in this example, the Windows Firewall on the remote machine was blocking port 9909 UDP, which was resolved by configuring the firewall to make an exception for port 9909 UDP).

    Remote Installation/Upgrades/Removals


    Domain Time II Manager allows you to remotely install and configure Domain Time II Server, Windows Clients, and Windows Time Agent on any Windows system on your network. Non-Windows clients cannot be remotely installed. Remember that you can only install, upgrade, or remove on machines running the same processor platform (32 or 64-bit) as your Domain Time II Manager machine.

      Set the Installation Defaults
      Remote Installation uses the domtime.ini setup defaults template file on the Manager machine to set the various configuration options on the product being installed. You can preset these options (such as specifying time server addresses, log settings, system tray options, etc.) for your installations by editing this file. The file is heavily commented, with all entries fully described, so it is very easy to understand the settings

      Click the Edit INI Defaults button on Manager's Advanced Settings page to edit this file. Be sure to review this file carefully to be sure it has correct entries before proceeding with your installation or upgrade.

      Installing, Upgrading or Removing Domain Time II on a Single Machine
      Connect to your desired remote machine as described in the Making the First Connection section above. When connected, you'll see the "Connected To" screen. Use the Machine Control and Status toolbar to perform installation, upgrades or removals.

        Connected To Screen - the Install icon Install
        If this is a fresh install, click Install icon. You'll be presented with a selection screen where you can pick which Domain Time II component to install. Note that the Windows Time Agent is automatically installed along with Server and Clients. You should only select the Windows Time Agent if that's the sole component you want to install.
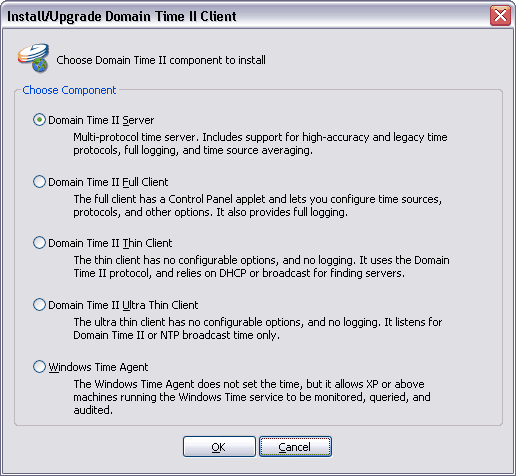
      The Remote Installation Menu

        The installation routine starts the remote service by default. If you want to stop the service, click the Stop Service Stop Service icon. To restart it, click the Start Service Start Service icon.

        Connected To Screen - the Upgrade icon Upgrade
        If there already is a Domain Time product installed on the remote machine and it is older than the version of Domain Time II Manager you're using, you will have the option of upgrading it. Click the Upgrade icon to proceed.

        If you want to change the type of software on the machine, such as replacing the Thin Client with Full Client or Server, you will need to remove the existing service first. Click the Remove Service icon to do this. Once the service is removed, you can then install the desired software as above.

        Connected To Screen - the Remove icon Remove
        To remove the installed Domain Time component, simply click the Remove icon.

        Note: The Windows Time Agent is usually removed when you remove Server or Client. However, if the Agent was installed on the remote machine before Client or Server was installed it will remain installed after Client or Server is removed. If so, you'll notice the Remove icon remains active after the Client or Server removal. Clicking the Remove icon again will then remove the Windows Time Agent.

      Installing, Upgrading or Removing Domain Time II on Multiple Machines
      Domain Time II Manager also has the ability to automatically install and upgrade Domain Time network-wide. See the Batch Operations and Update Server pages for detailed instructions.

    Controlling Domain Time on Remote Systems


    If Domain Time II is already installed on the remote machine when you click on its name in the Browse list (or use the Select machine to control section), the Connection Details screen will show information about its status and allow you to remotely control the installed Domain Time components on that machine.
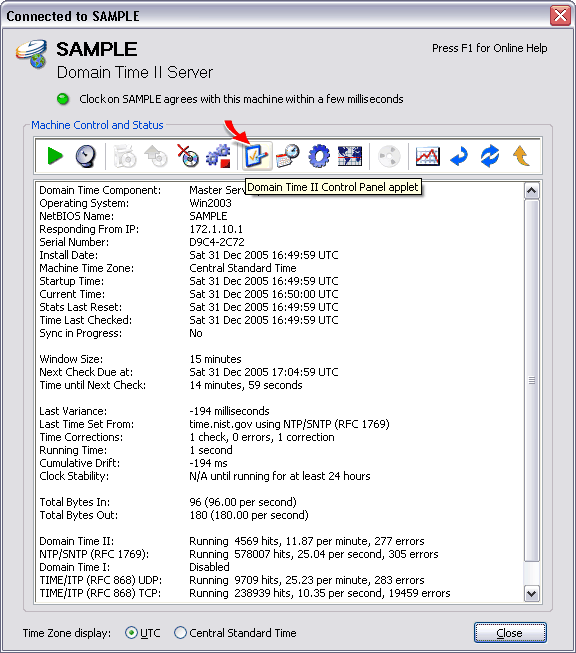
Connected To Screen with Domain Time II Server installed

      Stats Display and Time Sync Controls

        Sync Time Sync Time
        Click this icon to cause the remote machine to immediately attempt to synchronize its time with its time source(s).

        Drift Graph Drift Graph
        Click this icon to show the clock drift graph from the remote machine.

        Refresh Stats Display Refresh
        Click this icon to refresh the statistics display.

        Auto-Refresh Stats Display Auto-Refresh
        Click this icon to cause the stats display to continually refresh until the icon is clicked again.

        Reset Stats Reset Stats
        This icon will reset all time statistics to their initial state. It will also clear the drift log data.

        Time Zone Display (at the bottom of the screen)
        You may set the Statistics to display in Universal Coordinated Time (UTC) or in the Local Time of your management workstation. This affects how statistics from the remote machine are displayed while looking at this screen. It also changes how time is displayed in the drift logs. See the Time Zone setting section below on how to change time zones remotely.

      Remote Controls


        Remote Control Panel Remote Control Panel Applet
        On remote machines running Server or Full Client, you can pull up their control panel applet by clicking on the Control Panel icon on the toolbar. You can then make config changes, trigger syncs, or view logs just as if you were seated at the remote machine. Note that a few specific functions that must only run on the remote machine, such as the protocol test buttons on the Time Sources tab page of Server and Full Client will be unavailable.
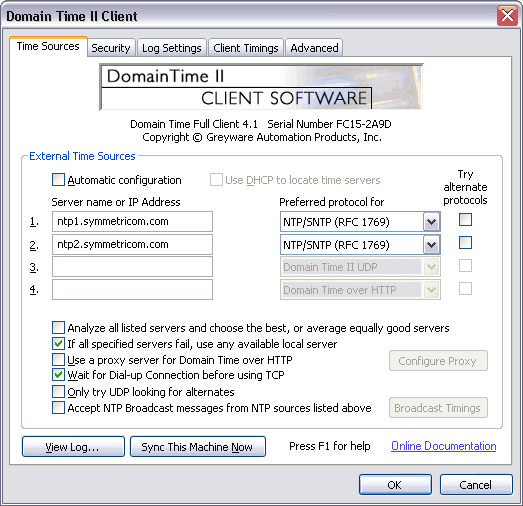
        Remote Control Panel Applet

        Other Options Options
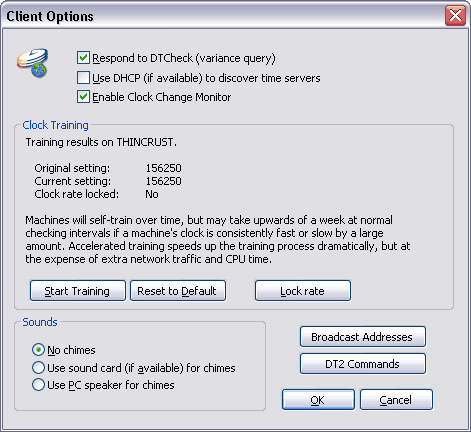
        Clicking the Options icon displays other settings you can change on the remote machine. This feature is available on Domain Time II Server and the Full, Thin and Ultra Thin Clients. These are the only remotely controllable options on the Thin and Ultra Thin Clients (other than the Time Zone setting detailed below).

        Remote Machine Options

          Respond to DTCheck (variance query) specifies whether this instance of Domain Time II will give a response when you run the DTCheck time variance report utility, or run a Variance Report from Domain Time II Manager or use the Domain Time II Monitor Service. Servers always have this option enabled (so this checkbox will be greyed-out). If you want to include a Domain Time II Client machine in variance reports, click this box.

          Use DHCP (if available) to discover time servers specifies whether this instance of Domain Time II will attempt to use DHCP options to discover the IP address of a time server. Read the Using DHCP to Specify Time Servers discussion to find out how Domain Time II works with DHCP. DHCP discovery is only available for Clients; this option is greyed-out on Servers.

          Enable Clock Change Monitor turns on or off the clock-change monitor, a built-in routine that immediately corrects any changes made to the system clock from other programs or the control panel. You can also set this option in the registry. Read about how the clock change monitor works on clients or servers.

          Clock Training
          Allows you to trigger Accelerated Clock Training on this machine, lock in a clock tick rate, or reset the clock training settings back to the default.

            If clock slewing is enabled, Domain Time II will attempt to "train" the system clock to more accurately track its time source by making tiny adjustments to the system clock rate (also known as the system tick rate). You can enable slewing on Server or Full Client by checking the Use slewing to improve long term clock accuracy checkbox is checked on the Advanced tab of their control panel applet. Slewing is always enabled on Thin and Ultra Thin Clients.

            The original tick setting of the system clock is displayed on this dialog screen along with the current trained tick setting. This allows you to see exactly how much the remote system's clock has been adjusted.

            Start Training
            Accurate clock training can take a very long time (days or even weeks), since the system has to analyze many variables each time the clock syncs and the resulting amount of change made is very small and must be constantly re-evaluted. This process is automatic if slewing is enabled, and normally does not need to be adjusted.

            However, it may sometimes be desireable to take a shortcut to speed up the training process. The Start Training button initiates a special accelerated clock training sequence that causes an extended series of rapid clock synchronizations that allows the system to estimate what the correct clock rate is in a relatively short period of time. The main drawback of accelerated clock training is that the clock training is not as accurate as the automatic training done over a long period. It also can result in an incorrect tick rate if the time source is unreliable or the local machine is under unusual load. Automatic training accounts better for activity spikes and unusual latencies than does accelerated training.

            Lock Rate
            The Lock Rate button is an advanced setting and should be used with great care. Locking the clock rate freezes the current tick setting and prevents any further clock training. This is useful to correct for the tiny clock jitter that can occur if a clock is well trained but cannot quite exactly match its time source. You can lock in a clock rate that is slightly faster than the time source so that clock corrections are always minimal and the clock does not fluctuate. Locking in an incorrect clock rate will cause your clock to continuously drift at a rate greater than if training were allowed to continue. Locking should never be used if the selected time source is unreliable.

            Reset to Default
            Sets the system tick back to the operating system default setting.

              Recommendations:
              • Use accelerated training on your master time server when you first deploy Domain Time II on your network. When the master is fully trained, then you can use accelerated training (if needed) on each slave.
              • Allow other machines to automatically train their clocks without accelerated training if possible.
              • Do not use accelerated training on clients before their master and slaves have finished either self-training or accelerated training, since this will result in inaccurate training of the client.
              • Do not lock the clock rate unless you fully understand the implications.

            Broadcast Addresses
            Allows you to add or modify the list of UDP broadcast addresses used by the remote Domain Time component.

              Note that this is not the same list as the Broadcast Addresses that are entered for Manager's use from Manager's Advanced Settings page. This list is the one kept and used by the remote component itself.

              See the Working Across Subnets page for more information on the Broadcast Address list.

            DT2 Commands
            This button brings up the Domain Time II Command Restrictions dialog for the remote machine. You can use these settings to restrict what kind of Domain Time II control and sync messages the remote machine listens for on the network for additional security.

              These are advanced settings and should not be changed unless you understand the ramifications of your changes. See the discussion of the Command Restrictions in the documentation for the Domain Time II component you're working with:

            Sounds
            The Domain Time II Server and Windows Client services can indicate a successful time synchronization with an audible signal.

              Timeset Chimes are off by default. You can enable them by selecting the sound device you want to use to play the chimes. Select Sound Card if one is installed or use the PC speaker. The Timeset Chimes will play whether or not there is a logged-in user.

              Choose Chime Off if you do not want the signal to play.

              There are also Time-of-Day Chimes available on Domain Time II components using the System Tray Applet, however, these can only be controlled by the logged-in user on the machine itself. Time-of-Day Chimes cannot be remotely controlled using Manager.

              See the System Tray Applet documentation for more info.

          Windows Time Applet Windows Time Applet
          Click this icon to bring up the Windows Time Applet for the remote machine. The Windows Time Applet is a special control panel applet that allows you to configure the Windows Time service. The applet will run on Windows 2000 systems, but it is severely limited in its capabilities.

            The Windows Time Applet icon is always active if Windows Time is present on the remote machine, even if the Windows Time Applet itself is not actually installed. This allows you to change the Windows Time Settings using Manager without installing any software. When using the applet in this mode, there will be no Agent tab available in the applet.

            The Windows Time Agent is automatically installed when you install Domain Time II Server or a Windows Client service, or you can install it as a stand-alone product. When Windows Time Agent is installed on the remote machine, clicking the Windows Time Applet icon in Manager shows you the complete Windows Time Applet application, including the Agent tab.

            Read the Windows Time Applet documentation for complete details on how to use the Windows Time Applet.
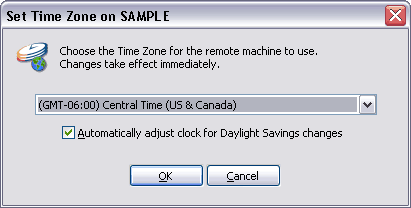
          Time Zone Time Zone
          Domain Time II Manager has the unique ability to remotely set time zones on Servers and Clients. This is extremely useful, since quite often the operating system time zone settings are set incorrectly when they are initially configured. When you click on this button, you'll be presented with the time zone selection screen for the remote machine.

          Remote Machine Options

          Audit Server Remote Control Panel Audit Sever Remote Control Panel
          If the machine you are connecting to remotely has Domain Time II Audit Server installed, the Audit Server icon will be active. You can use it to pull up its control panel separately from the Domain Time Server installed on that machine. Although you can configure Audit Server using Manager, you cannot remotely install or remove it using Manager.

          See the Audit Server documentation for complete information about Audit Server.


        Next Proceed to the Variance Reports page
      Back Back to the Installation Instructions page

    Domain Time II Software distributed by Microsemi, Inc.
    Documentation copyright © 1995-2025 Greyware Automation Products, Inc.
    All Rights Reserved
    All Trademarks mentioned are the properties of their respective owners.